
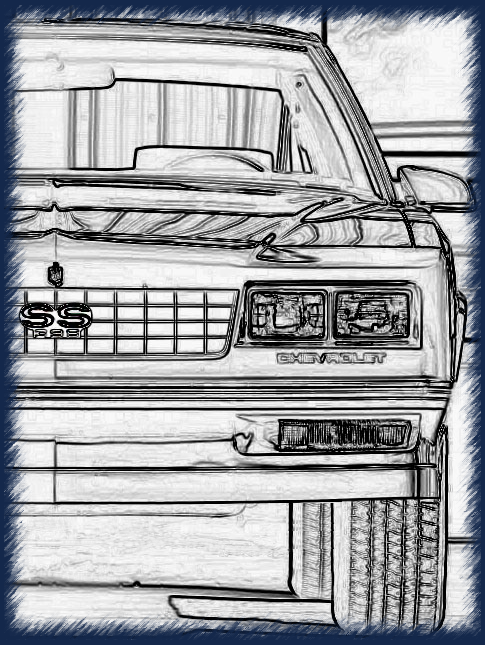
87 Monte SS - Parts Page
A Comprehensive List Of Purchased Parts
|
Source
|
Item
|
Cost
|
|---|---|---|
| Stan Egan's Auto World | 1987 Chevrolet Monte Carlo LS | 2,999.95 |
| Summit Racing | GM Performance ZZ4 350 C.I.D. 355 HP Engine Assembly | $4,049.95 |
| Summit Racing | GM Performance Serpentine Accessory Drive Kit | $795.95 |
| Fleece Bay | GM Delco AM/FM/Tape/EQ/MP3 input: '83-'88 Cutlass/Regal/Monte | $60.00 |
| Eastwood | Eastwood Extreme Chassis Black Primer (Quart) | $32.99 |
| Eastwood | Eastwood Extreme Chassis Black Satin Top Coat (Quart) | $39.99 |
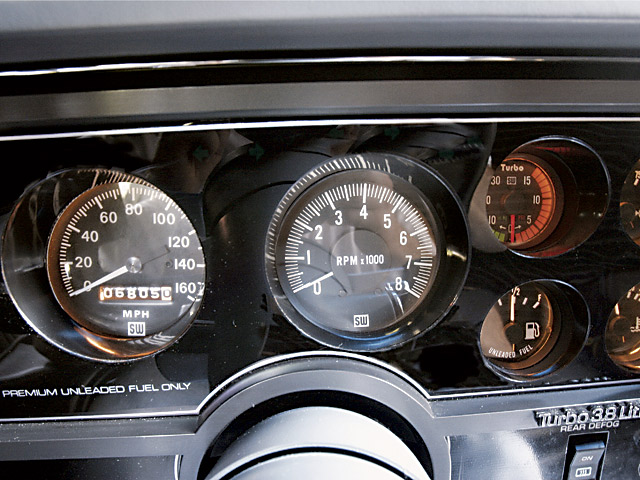
| Fleece Bay | Vintage Stewart Warner Speedometer & Tachometer | $120.00 |
| Mountaineer Swap Meet | 83 Pontiac Grand Prix Console, Shifter, Brackets Package | $60.00 |
| Fleece Bay | $1,499.00 | |
| Super Chevy Swap Meet | Pair of 2006 Pontiac GTO Bucket Seats | $200.00 |
| G Body Forum | 1986 Pontiac GP Complete Dashboard Assembly | $250.00 |
| Monte Carlo SS Club | Jeep Grand Cherokee U-Joint Style Steering Shaft | $50.00 |
| Fleece Bay | G Body Floor Shift Style Steering Column | $210.00 |
| Auto Body Shop Supply | 1 Can (Quart Size) 3M Brushable Seam Sealer #08656 | $24.95 |
| Auto Body Shop Supply | 1 Caulk Tube of 3M Fast 'N Firm Seam Sealer #08505 | $18.95 |
| Midway Auto Parts | 1 Gallon Can of Southern Polyurethanes Epoxy Primer/Activator | $170.00 |
| Ron's U Pull It | 96 Lincoln Mark VIII Electric Fan/Shroud Assembly | $24.95 |
| Local Craig's List | ACTUAL Buick Grand National Rear End! | $900.00 |
| Fleece Bay | G Body Seat Belt Retractors & Plastic Trim Panels | $40.00 |
| Monte Carlo SS Club | Pair of Center-Console Style Seat Belt & Receptacles | $20.00 |
| G Body Forum | Set of Grey Seat Belts for Rear Seat | $60.00 |
| Fleece Bay | OEM Dual Snorkle Air Cleaner | $65.00 |
| Fleece Bay | Trans Am Shaker Assembly | $125.00 |
| Fleece Bay | 83-'88 Oldsmobile Cutlass Supreme Radiator Top Bracket | $44.99 |
| Total | $11,886.62 |
As of this writing (October 2011) I've sunk almost 12k into this project! Most of it in two horrifyingly large chunks. The initial 3k for the car and just over 4k for the new engine. And don't get me started on the $1500 bucks I wasted in an expensive lesson in e-commerce. Grrrrrrr! In terms of man-hours, I've logged 210 hours up to this point, with more yet to come.

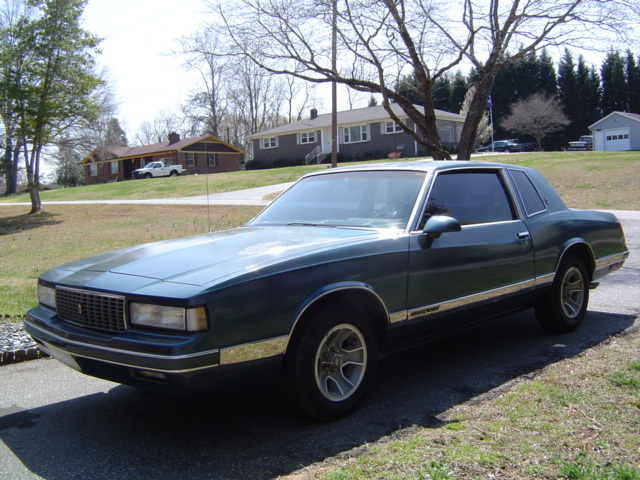
I hadn't really wanted to spend what I did for a usable donor car, but there was no haggling with the dealer. What I also failed to realize is... as the prices of new cars spiral ever higher into the stratosphere, older/used cars have a higher value as well.
So I swallowed that "bitter pill" of realization and ponied up the cash for the Monte. For its age, the car's in really good shape and should provide a solid foundation for my build.
Besides, my plan is to (eventually) sell off everything I don't need or want and (hopefully) recoup some of the cost of purchasing this car.
If there was one aspect of the Monte Carlo SS most enthusiasts found fault with, it was a lack of power the taut suspension, and throaty rumble encouraged. Although 180 horsepower was a vast improvement over the early-mid '70's power levels, on the street it was easily bested by it's Buick stablemate, the Grand National.
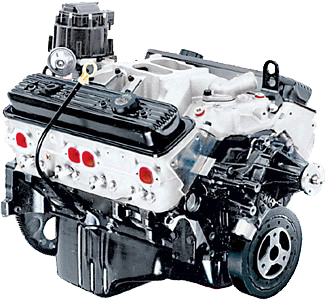
Since the Grand National sported a mere V-6 something had to be done. The principal goal of this build was to rectify the power shortcomings of the assembly line. I didn't want to go crazy and drop in a big block (although creating my own interpretation of an retro SS-396 would certainly bump up the wow factor) I wanted a reliable performance engine that would be totally streetable.
To that end I turned to Chevy's past and took inspiration from the 350 powered Camaro. Since my ultimate goal is a well-balanced package not just overwhelming power, the 350 seemed the logical choice.
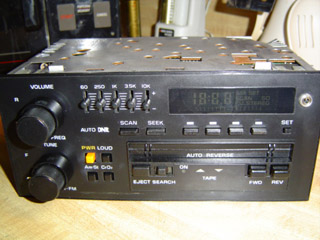
Since moving South, I have discovered a dearth of radio stations worth listening to. Back when I originally ordered the SS, I couldn't quite pony up the extra scratch for the top shelf radio with the built in equalizer.
Since the Delco head unit is good for about 75 watt output, I decided to grab a refurbished one and upgrade the crappy paper speakers to some modern Infinity Kappa speakers.
To that end I turned to Flea-Bay where a guy is modding the stock head units with a 1/8 input jack for mp3 players. The price was under $100 bucks and sounds awesome. Since I'm not building a "Boompha" car you can hear for blocks around, it suits me just fine... of course you may hear my twin pipes from a distance, but that's music of a different sort.
When you're building a street-rod (as opposed to a restoration) the sky's the limit when it comes to custom touches. At some point, I decided to convert my Monte from a bench seat/column set up, to bucket seats with a floor shifter. I stumbled across this at a local swap-meet and since it came out of a Grand Prix it should be a bolt-in.

The clincher for buying this was that the guy who removed it took the time to include all the hardware, cables and even removed the mounting brackets from the floor of the GP. My plan is to weld them into my Monte and install the console. The shifter will have to be swapped out for one compatible with my automatic w/overdrive tranny, but I'll cross that bridge when the time comes.

Over the years, one thing has really bugged me about the dash on my Monte. The gauges are tiny (not to mention erratic), and as long as I'm upgrading the rest of the car I figured the dash needed a major makeover as well. I found one enthusiast who replaced the factory speedometer with one out of a Chevy Malibu cop car. I'd been planning all along on upgrading to a 160 MPH unit, so this idea intrigued me. Problem 1: just where in the blue blazes (outside of Flea-Bay) would I ever find a similar speedo to add to my stock cluster? Problem two...it's still the stock cluster in every other aspect. Nice subtle approach though.
Malibu Pursuit
GNX Instruments
The problem with GM's mini gauges is that ordinary old-school aftermarket gauges won't fit, due primarily to a lack of space.As I pondered what to replace my crappy gauges with, I stumbled across the Buick GNX dash. It was love at first bite. Of particular interest was the fact that the skunk-works responsible for the radical GNX saw fit to go old school and slap a set of Stewart Warner gauges in the thing. The only problem with this idea was the limited production run of the Buick GNX. When new, folks were snapping these up as blue-chip investments, banking on the value of such a limited-production machine... evidently including and any/all parts associated with it.
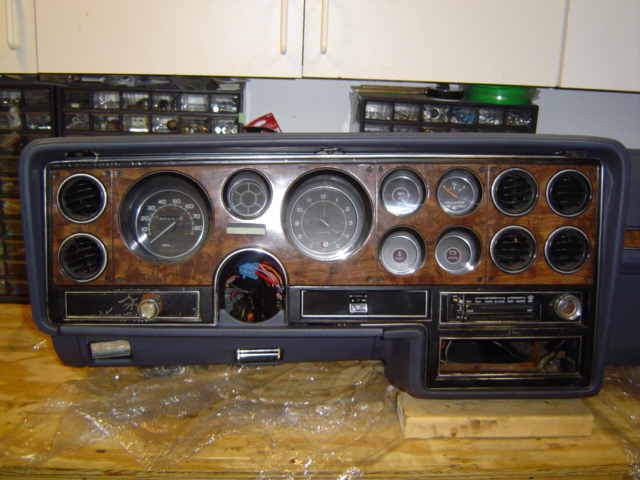
After studying various approaches other SS owners had taken, I reached a decision. I summarily scrapped the whole "hybrid dash" idea and instead selected a Pontiac Grand Prix dash from the same era as my Monte. Pontiac was known as the performance division during the 60's & 70's so the performance vibe is still there and the console shifter knob is the same as on my 1970 GTO so my new theme for the SS will be cohesive.
I decided that the Grand Prix dash had a much more integrated look, like somebody took their time to create a usable layout. What I plan on doing is adapting the stock instrument cluster, installing my Stewart Warner gauges, while keeping the stock idiot light pod in between. Mexican Montes actually came with the Grand Prix dash as standard equipment. I went the "grass roots" route and joined the G Body Forum web page and found a vendor parting out 17 cars similar to mine! I emailed the guy, called him on the phone, we chatted a bit and I decided to buy this from him. This guy was great and our deal was smooth sailing all the way. If you're partial to Flea-Bay, his seller ID is: Turbov6 and he's a straight-shooter.
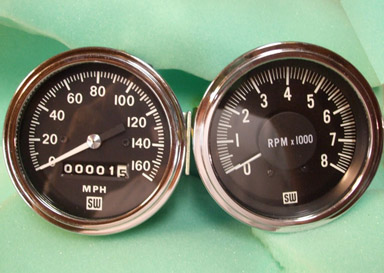
Since a genuine Buick GNX instrument assembly is going for stupid ($1,500 smackers) money, I will create my own performance themed dash. The GNX sported no-nonsense Stewart Warner white on black gauges. Really old school. Okay then. With that in mind, I set out to collect a set of Stewart Warner gauges of my own that I could mount in place of the stock Grand Prix gauges. The layout of two main gauges in front of the driver and four suplemental gauges to the right is the same as the GNX assembly.
ALERT: Whatever you do don't buy ANYTHING from ebay vendor known as "carguyjr" selling Buick parts. This includes his "worldofmotorworks.com" website! He is a thief and a criminal.
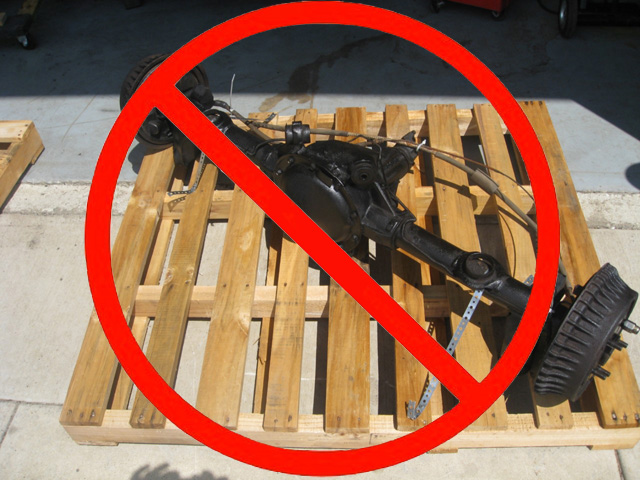
This represents the real sore spot of my build. I "bought" this off flea-bay in August, 2010. I thought I was buying a Grand National 8.5 posi rear end, but the seller has not shipped the unit. In my last phone conversation with him, I was informed it would ship on Oct. 27th 2010. He lied. I sincerely hope a devastating (life-altering totally debilitating) tragedy befalls this chiseler! Perhaps even two. Yes, I believe two would be perfect.
And if anyone reading this thinks Pay Pal will protect them, think again! Their so-called "protection" is only valid for 45 days. Naturally, they suggest you try and work out any problems with the seller directly.
Well guess what, by the time I attempted to do this (via many emails and phone calls) the 45 days were gone! My advice? File an INR report after 5 days! That should light a fire under the seller!
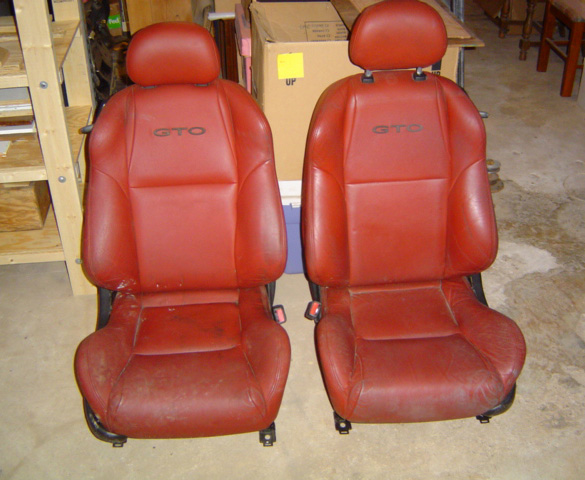
I attended the Super Chevy show in Bristol TN in September, and the swap-meet area netted me a pair of 2006 GTO bucket seats. There's lots of folks on the montecarloss web site doing this swap and those who've done it have nothing but raves regarding the substantial improvement this makes.
The only downside is the color. Bright red (made hyper-intense by my camera's flash) doesn't exactly match with my blue/gray theme. I have to reupulster the back seat anyway, so I have everything done at the same time and it should make a nice overall upgrade to the interior.
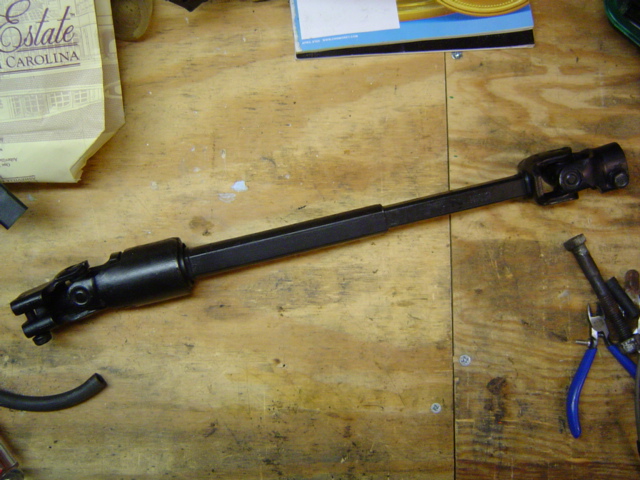
The rag-joint on both Montes had deteriorated to the point of needing replacement. There's lots of folks on the montecarloss web site swapping in the dual universal joint steering shaft from a mid-late '90's Jeep Grand Cherokee.
The benefits include a cleaner engine bay (with more clearance for headers) as well as removing slop from the steering. That sounded like a win-win to me, so when a fellow member had several up for sale I grabbed one. This saved me the hassle of junkyard hunting and saved me a bunch of time to boot.
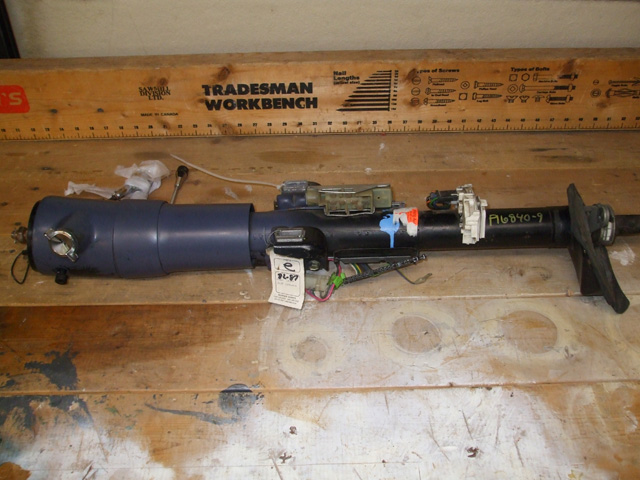
Then there's the other end of the equation. If I'm going to be changing over from a column shift arrangement to a floor-shift arrangement I'm really going to need one of these.
After getting burned once on Flea-Bay I bit the bullet and grabbed this in a buy it now auction. This time however, I was only wagering around $200 bucks and was keeping a close watch on the 45 day PayPal INR (item not received) deadline.
I came home the Wednesday after winning the auction and it was waiting in my carport. Now that is a little more like it!

At the onset, I knew that a cooling system upgrade would be necessary. The cooling was marginal with the 305. The new 350 will be getting a serious upgrade both in the radiator department as well as the fan to keep it cool.
I never liked the way the clutch fan roared whenever I started the car to go somewhere. This will be a much more modern and efficient way of keeping the engine cool during the blistering southern summer months.
Thanks to my montecarloss club I narrowed the choice down to 3 units. A Dodge intrepid twin fan unit. A GM F-Body LT-1 twin fan unit, or ... a Lincoln Mark VIII fan, easily the most robust and powerful choice. So that's what I grabbed.
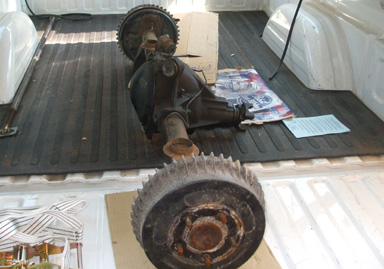
BOOYAH! I finally picked up a GM 8.5 rearend for my build. This time I found the holy grail on Craig's list not far from where I live. As luck would have it, I was home sick with a head cold, so I fired up the old laptop and went surfing. Naturally enough, I checked out the car parts section and hit paydirt. It was only about a 20 minute drive from my house too.
I called the guy and went over to his house to check out the rear end. Other than the 5.56 gears he'd installed it was just what I'd been looking for, so I bought it and brought it home in short order. Not sure yet if I'll go 3.42 (stock GN ratio) or 3.73 (stock SS ratio), but at least I've got the important part!
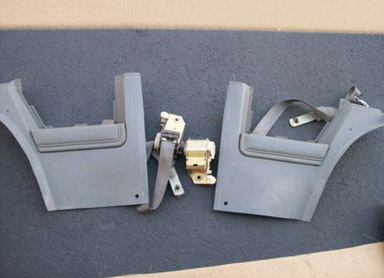
Another Flea-Bay gamble... only 40 bucks this time though. I didn't really need the arm rest panels but they came with the seat belt inertia reel assembly and the price was right, so I grabbed them.
Since I'm changing the color of the interior to grey, I need grey seat belts to complete the change. All I need now are the front "recepticle" set that bolts to either side of the center console.
Once I get those I just need the rear seat belt assemblies and that's done. I've seen sets pop up on flea-bay from time to time, so I'll get what I need eventually. The other plastic and trim pieces will be painted to match the factory grey color.
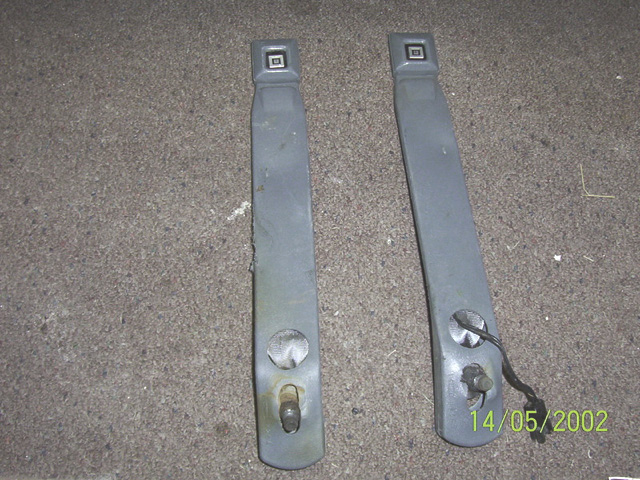
Another score from a fellow Monte Carlo SS web-club for the grand and glorious rate of $20 bucks. One plastic part has a place I'll have to touch up a little, but it's between the console and the seat down low where it's not obvious.
I'd been seeing these come and go on Flea-Bay for awhile and finally decided I'd better grab a set or I'll never be able to drive the darned thing when the time comes. Another guy on the G-Body website is parting out 17 G-bodies and I bought a set of the grey seatbelts for the back seat from him.
If it seems like I'm obsessing over these, I can get the seats and headliner reupulstered and paint the plastic trim pieces, but how do you go about doctoring the webbing of the factory seat belts? I have no idea and now with these last couple of purchases, I won't have to give it any more thought.
Another Flea-Bay purchase... only 24.95 bucks this time though. For quite some time I've been tossing around the idea of adding a custom touch to my tail lights. Sequential LED's would be cool, but are price prohibitive at the moment.
Since I'm changing the color of the car to a dark blue this style with car-colored strips dividing them will help lend a black-out look to them. All I need to do is somehow modify them to fit my car's body lines and it'll give me a unique yet subtle custom touch.
I may have to shoot the lenses with some lens-black paint to get the look I'm trying to achieve, but I'm getting ahead of myself again. I originally thought housings from a '69 Chevelle might look cool, then the idea evolved to staying within the same car line and model.

Another score from a vendor on the g-body forums blog (same guy I got the GP dash from) for the grand total of $60 bucks. The beauty of this approach is the simplicity of acquiring parts (without hiking across miles of junked autos), keeping the car all GM, all without resorting to the aftermarket.
Most cars of a similar vintage to mine (nearly 25 years old) have long since been sent to the crusher, unless you get really lucky and stumble across one in an old, old junkyard that hasn't been "scrapped out" in ages. In fact I haven't found a wreck older that the mid 90's at my local you-pull-it yard.
Just one more advantage of joining an on-line club dedicated to the one car you're fixated on. It makes finding those rare and obscure pieces much more easy than either Flea-Bay or the local boneyard.
Flea-Bay again (unfortunately a necessary evil for this project), 44.99 this time. This is an upper radiator bracket from an Olds Cutlass Supreme (G-Body) which folks have been using to upgrade Monte Carlos from a traditional clutch-fan to an electric fan setup.
All I need at this point is an upgraded radiator (and external trans cooler), and my cooling system should be able to handle the blistering heat waves we get here in the South lately.
This was the cheapest one I've found, and I had some cash handy, so I grabbed it. Every other version I saw (bead-rolled aluminum, chrome etc) was 75-80 bucks. Another piece of the puzzle added to my parts cache.
One of the primary features of my rebuild will include a Trans Am shaker hood scoop. This was an fleabay score back when they still accepted money orders rather than strong-arming folks into using PayPal. This took some doing as I got sniped out of two at the last second by the same clown with the same eBay ID. Okay... I fixed that fucker next time, I bid crazy... like $300 crazy at the last minute. I looked at the bid history after the auction (which I won for $125), and this prick tried four up-bids at the last second. But I beat him. Oh yes I did!
The previous owner had cut out the back of the unit pretty carefully, as this generation of Trans Am shaker was sealed at the factory. I plan on installing a flapper-door setup for full functionality, so this didn't bother me. I'd always thought this generation of shaker would look good on an SS due to the center ridge that matches the hood. I like to stand out from the crowd, so the cowl-induction hood everyone and their brother is running quickly fell from favor.
I toyed with a dual snorkle air cleaner on the LS when I was running it around briefly. My original thought had been to utilize the dual snorkle base with the T/A shaker. The only problem is the dual snorkle is 15.5 inches in diameter and the T/A shaker base is about 18 inches.
Since the T/A shaker base has all the indentations necessary to clear the distributor and various other items, I may use that base and build upon it. It'll probably be easier than fabricating a new piece to fit on the shaker that will mate to the dual snorkle setup. At this point I'm only guessing though.
Another exterior feature I wanted were a pair of fender vents. Naturally, I turned to the GM F-Body cars of the late '70's. The main problem I encountered was one of proportions. The vents used on the Camaro Z28 (and the Pontiac Trans Am) were obviously too big for my fenders. As with the shaker, I wanted these to be functional not simply a tacked on decoration. I found the solution was as close as the Monte's primary rival the Buick GNX. This realization (in addition to some folks already having done this mod) clinched the idea.
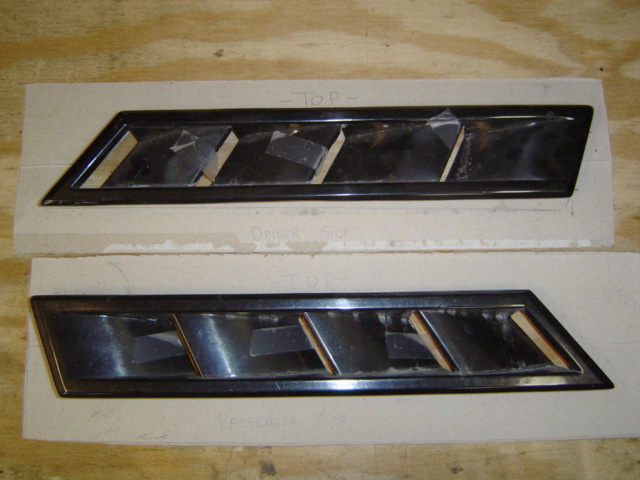
Here's a shot of the vents I selected for those who haven't seen them before. My original thought had been to utilize the fender vents for the same purpose as the GM engineers... venting underhood heat. Once I decided to make use of headers, this consideration became even more important.
Evidently these were originally held on with adhesive foam tape. I'm not certain if the originals had any ductwork associated with them. At least I've never seen any. It'd be easy enough to fabricate some if I deem it necessary once I get to that point of the build.
I've been toying with the idea of hidden headlights for the past decade or so (on again, off again Harrigan) only now am I giving it some serious consideration. The idea was born from the popularity of all the smoked aftermarket headlight covers I've seen on Monte's over the years.
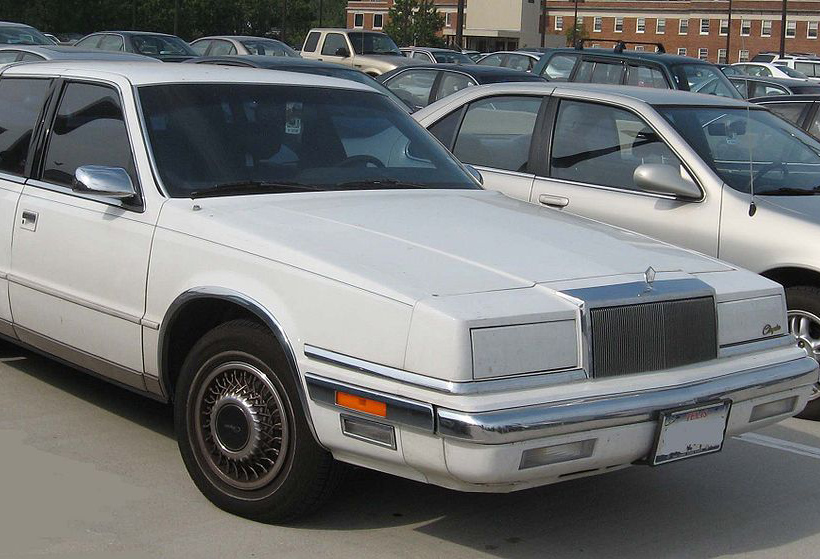
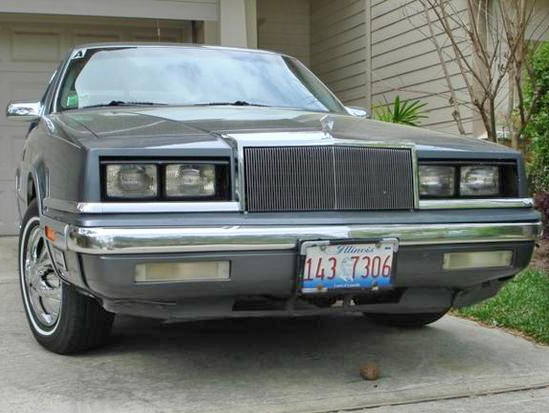
My research into hidden headlights led me to the K car Chrysler produced during the late '80's-early '90's. The reason for the attraction to Chrysler products is simple. The size, shape and engineering make them ideal candidates for what I'm considering.
As near as I can figure, I'll need the parts from the 1988-1991 model years. 1992 was a changeover year, with the bodystyle changing to a more "rounded" design. In conjunction with the redesign, all 1992 and later cars retained the retractable headlight doors but... they are a "bottom-retracted" design. This won't work for what I am planning, as the headlight doors retract downwards towards the bumper... an area that's solid on the Monte. The Monte does have space available above the headlights where concealed headlight doors might fit.
1988 - 1991 Closed
1988 - 1991 Top Opening

1992 - 1993 Closed

1992 - 1993 Bottom Opening
While my SS is undergoing a frame-on restoration I kept noodling around with this idea, but never got motivated to actually implement it. That is... until a fellow montecarloss website member jumped into this modification with both feet! It was game on and I redoubled my scrounging efforts for a donor car that was in good enough shape to get parts from. The junkyard closest to my house was a complete bust, having only newer cars. A 45 minute safari to a second bone-yard and I hit paydirt. They had a couple of 90 Chrysler New Yorkers within a couple of yards of each other, the front ends of both fully intact!
Having no idea how to take the thing apart, I started by removing the sheet metal access panel that runs across the top of the header panel. The early November sun was screaming off the grille surround as I finally figured out how to pop the grill off to get to the goodies. The grill is actually held on by 4 spring clips and one firm tug on each side and it simply popped off!

I learned several things as I squatted there, swapping between (10mm & 8mm primarily) various sockets and extensions. First up, the guys who designed the hidden headlight setup on this car were masters at compact packaging. You can also tell from studying the apparatus just how this option could be added to a fixed headlight model on the assembly line.
As I proceded to skin my knuckles on every sharp edge in site, (a previous owner had installed an aftermarket transmission cooler just to keep things interesting) the headlight doors put up a valiant fight. No matter which way I tilted or turned them, they positively refused to come out of the opening they filled in the header panel.
Finally, in desperation, I grabbed my compact hacksaw and cut several of the fiberglass mounting studs to get enough room to slide the doors over to the center grill opening for extraction. Approximately three hours after I started, I emerged filthy, but victorious and brought home my booty. Thankfully I wore a long-sleeved shirt which bore the brunt of the salvage yard dirt and grease.

Here's a shot of the RH side which I was able to extract with minimal damage. While I don't plan on using these as a "bolt in" installation I hope to get the measurements I need to fabricate some custom brackets to intall these on my SS. However, in order to do this I'll have to epoxy the piece I accidently broke off back in place, so my measurements are accurate.
The next step (prior to cutting out any of my existing SS bracketry) is to measure and hold the various parts in place to see if this is actually do-able. The others who are attempting this mod haven't finished yet, so they may have run into an unexpected hurdle or not had the time to proceed any further. That's okay though, as long as we share our ideas, maybe we'll come up with a method and parts list that works.
I believe the doors themselves are made out of aluminum (at least magnets won't stick to them) and I'm not sure how one would go about modifying such a piece. Cutting, welding and other fabrication methods may not work with this material. This means if they don't come real close to fitting initially, this whole mod will be off the rails in short order.

The fellow member attempting this mod was able to get at the wiring harness for the headlights. Either the car he pulled his from was much more disassembled than the one I found, or he had more time to fool with the donor in the junkyard. Since I'll be using a different dash in my SS than the one it came with from the factory, I'll also me modifying the firewall plug. Since I'll be running new wires anyway, I wasn't concerned with getting the whole wiring loom from the donor car.
That being said, I still grabbed everything I could that seemed to be necessary for the system to function as it did from the factory. To that end I grabbed the headlight switch, headlight door motor, huge relay box, assorted brackets as well as the doors themselves and the square connecting rod that ties the whole assembly together. I also like the rubber bootie they wrapped the motor in to protect it from the elements.
The headlight switch looks pretty standard and with the right knob, you should never be able to tell I made this swap. The real appeal of this setup though, is that it is all electric. This means I won't have to deal with the troublesome vacuum operated assemblies they used in the late '60's.
The club member mentioned previously is using the later (1992+) version which uses differently styled and shaped doors. I'd considered these, but thought the flatter style would work better for this modification. Rounding off the square corners would be child's play, but this... well... it may turn out that I'll have to go (as Wile E. Coyote might say) "back to the old drawing board."
The headlight doors from the LeBaron are perfect little rectangles. The Monte? Well... one angle is obviously different, I grabbed my angle transfer tool and decided to see just how off things were. Needless to say this did little to boost my confidence level that I'd made the right choice of donor vehicle.
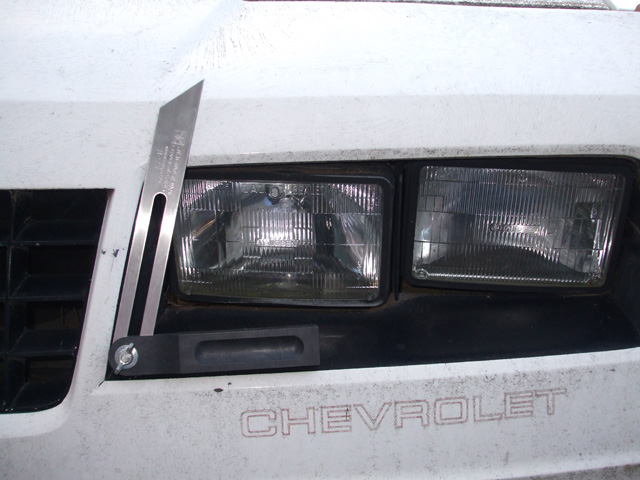
Here, I've transferred the angle from my measurement tool to the actual headlight door. All the material to the left of the blue tape would have to be removed in order for the door to fit the opening on the Monte.
Unfortunately for me, this includes the whole pivot arm. Things aren't looking too good for our intrepid fabricator at this point.
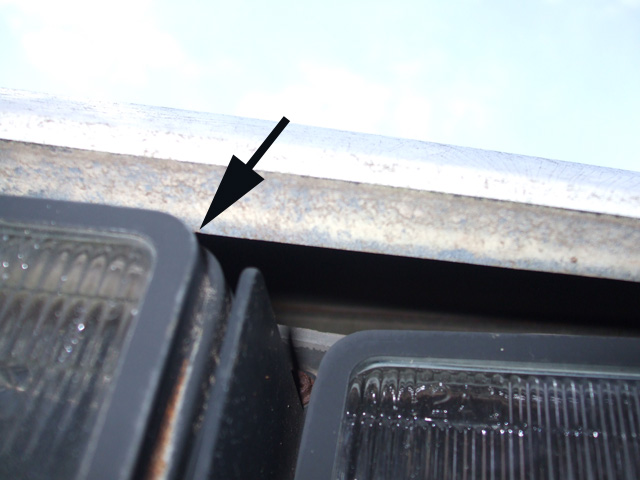
I made another disturbing discovery while I was investigating the nose of my SS. The headlights of my SS differ from the Chrysler in that they're actually stair-stepped.The low beam lamp (closest to fender) is recessed much like the Chrysler. BUT. The high-beam head light (closest to the grill) actually protrudes towards the front of the car more than the low beam light. Or, put another way when viewed from above, the two headlights are not in the same plane. More troubling still is the fact that they protrude past the upper edge of the headlight pocket opening.
The Chrysler in comparison had both head lamps an equal distance from the headlamp door. You could've laid a straight edge across them. I hadn't realized this before I began this little project. This means I may have to modify the headlamps themselves. I hadn't counted on that. I could probably do it, but I kind of wish I'd pulled the assembly off the little Mopar while I was in the boneyard. The nose of the Chrysler is perfectly upright in relationship to the front bumper. The SS has a grille that is not perfectly rectangular, but is wider at the top and narrower at the bottom.
© Copyright 2009 Brian Petruska | Top | Upgrades | GM Performance Parts | HTML Now! | Apple | Comments |