
87 Monte SS - Diversions

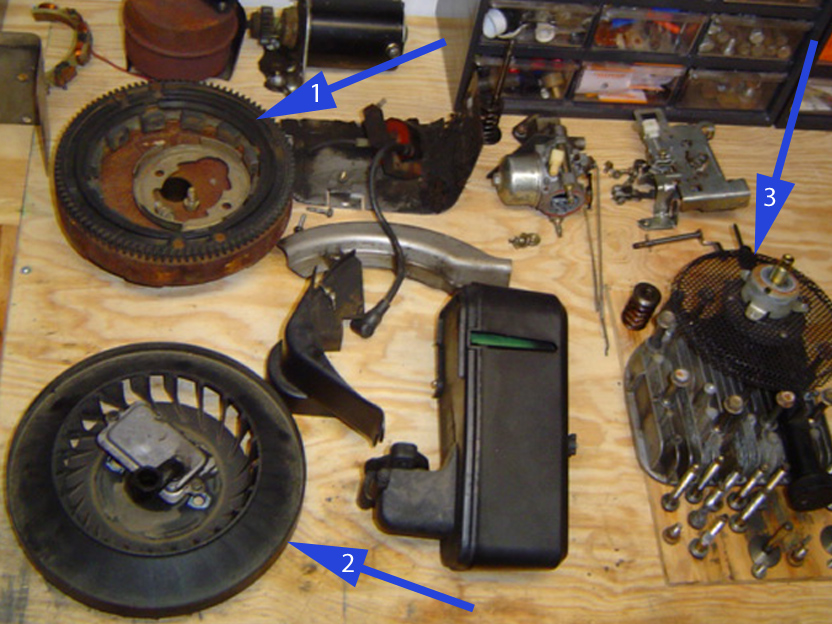
So, you may be wondering (more power to you if you are), is this guy just a gearhead or does he have any other hobbies? Funny you should ask. Actually, I am driven by a combination of frustration and nostalgia over things no longer being made the way they once were. There's a certain amount of patriotism mixed in as I ponder the way Big business has sold out America's once proud manufacturing base to foreign interests all in pursuit of the almighty dollar.
Politics aside, I have devised a solution that works for me. I buy American, and have gone to some crazy extremes to do so. Need a certain tool? Hit the yard-sales and flea markets (even eBay if I'm desperate), for what I need. For example, there's this small matter of yard maintenance to be dealt with, and I refuse to purchace anything made in China (or anywhere else other than America), in order to complete this chore.
My better half is sometimes amused by my "geography lessons" when shopping. That's where I look to see where an item is made and (when finding out it's made in someplace whose name I can't pronounce) begin to pontificate on the sad state of affairs our country is in. One clerk in Lowe's didn't appreciate my opinion, informing me I could go elswhere. I shoved some newly stripped made in Japan bolts under his nose and told him he should be ashamed to sell such crap. Then I did indeed go elsewhere. If you're tired of hearing customer complaints, run them up the chain of command. At least try to make a difference!
I grew up running an old Allis Chalmers tractor (Simplicity & Allis Chalmers merged sometime in the late 70's), so I knew which brand name had the quality I desired. My first forray into the Simplicity brand was when I traded a recalcitrant International to a guy who had a Simplicity with a blown engine. The previous owner had run the Simplicity low on oil and it had thrown a rod. I inspected the block and discovered both it and the crankshaft were still servicable. This started the little wheels turning in my head.

I wasted a considerable amount of both time and money on this machine, over one summer. My Uncle gave me this when he upgraded to a bigger machine since he had more acreage than we did. The primary problem with it was the engineering of the mower deck. The tractor itself ran just fine. Then there's this small issue of me being a perfectionist. I dig machines and understand how they work. I would make this tractor work as designed or know the reason why not. In the end, the agony of defeat was a rather humbling experience for Mr. Meticulous.
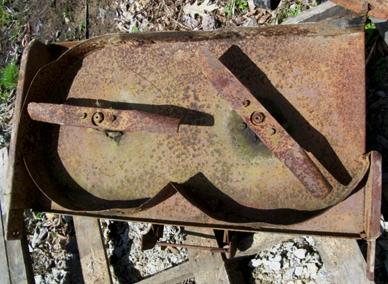
The mower deck had, shall we say, a unique approach to not leaving any strips of grass un-mowed... the deck had "timed" overlapping blades! I kid you not. If you viewed the mower deck from underneath, one blade would be oriented horizontally, while the other would be "clocked" 90* in the vertical position. The blades were kept timed (in theory), by a cogged belt like cars use for camshaft timing belts.
If the timing belt jumped a tooth or two, the blades collided with catastrophic results. One twig could literally ruin your whole day. My Uncle's inimitable solution was as unique as the design of the deck. He cut an inch off each end of each blade with an Acetylene torch and called it a day. "If you're worried about missing some grass, you're on a riding mower... turn around and go back over it a second time if it bothers you," was my Uncle's philosophy.
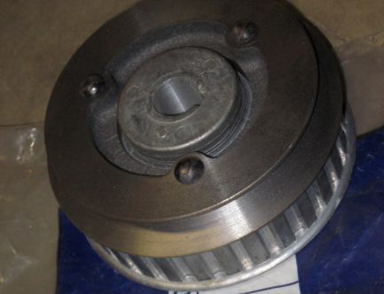
The timing cogs/pulleys were made out of aluminum. They mounted to steel, keyed shafts and held in place with a large nut. I ended up buying four of these before throwing in the towel. When the blades hit, you either tore up the belt or destroyed the aluminum cogs. Sometimes both.
In one instance I tightened up the nuts so tight, neither spindle would spin. Another session found me using red Loctite in an attempt to keep the nuts tight. I bought new blades, new belts, new aluminum cogs, nothing worked. My Dad was glad to see me get rid of this Jonah. In the end I still managed to come out on top, getting rid of this abortion in the process.

Where was I? Oh yeah... so, one day I was out driving my route in my job with a cable company, I spotted a John Deere for sale and stopped to take a look. It smoked, had rust holes in the mower deck and was (no surprise considering the brand), beyond my budget. However, the old guy and I got to talking tractors and I mentioned that I was really looking for more of a project machine... something I could fix up little by little, ending up with a reliable quality machine in the end.
So he says he's got an old basket case with a blown engine sitting in his shed that he didn't have the time or money to repair, so it's just sitting. HELLO! I asked if I could see it and he led me into an ancient quonset hut turned storage shed. The light grew dim as we picked our way through various piles of equipment and tools towards the back of the shed and there... so far back you'd have never seen it from the entry way, half buried under a tarp was the unmistakable grille of a Simplicity garden tractor.
The old guy and I shot the breeze and I saw a unique opportunity to rid myself of the troublesome International. I offered to trade the guy straight up, my running machine for his basket case. He looked at me as though I was off my rocker, but I had a plan. He was willing to humor me, so I told him I'd stop by next week to see if we could come to terms. When I started up the International and backed it off my pickup, he really must have been certain I was crazy. But... in the end we shook on it and traded machines.
As the International sat putt-putting in his driveway he helped me push the dead Simplicity up my ramps (the two nearly flat front tires didn't help any), and into the back of my pickup. We tossed the mower deck in alongside the tractor and finally loaded up the vintage wire milk-bottle crate which contained the remnants of the engine. Yes indeed, our hero had acquired a genuine bonifide basket case all right... basket included. He made a point of telling me that I had everything and that he didn't have any more parts for the Simplicity. Whatever... I just wanted to get out of there with my prize and he was worrying I'd be back demanding the missing parts.
I closed my tailgate as he ambled over to the little International. I saw him rev it up and head for the nearest patch of grass. I didn't waste any time. I threw my truck into gear and hit the gas, unintentionally throwing gravel in the process. To this day, I think each one of us thought he'd bested the other. I knew one thing for certain, I'd had enough of that stupid International to last me a lifetime.
I rebuilt the engine (and purchased all the other parts that were missing from a local Simplicity dealer), for this machine back in 1988 for about $850 in parts. Only now (2008), am I doing another rebuild. That's what used to be known as "Made In America" quality! Of course the parts are a lot more expensive now, but as long as I can still get parts, I'll keep running it. I grew up in an era before "disposable" became a way of life.


In 2002, I needed a bigger machine to help me take care of my folks place. Naturally it would be a Simplicity, but new ones were way too much for me to afford. Ah, but there's a new game in town, and it's called eBay!
I finally found what I wanted, an older 16hp hydrostatic machine with a 48" mower deck. I won the auction (by outbidding the previous highest bid by $1.25), making me the unit's new owner for the princely sum of $401.25. All I had to do was pick it up (freight costs then would have been prohibitive), which meant a road trip from SC to PA and back again!
I did that over a four-day weekend, staying with my inlaws who lived nearby to the seller's location at that time. It needed some work (which I knew prior to bidding), but again I knew I could rebuild it to be just what I needed for the job at hand. This time, I created a spread sheet to keep track of my costs. Between eBay, a local Simplicity dealer (not to mention a fellow Simplicity Garden Tractor Club member), my final tally came to roughly $1,500 dollars in parts.
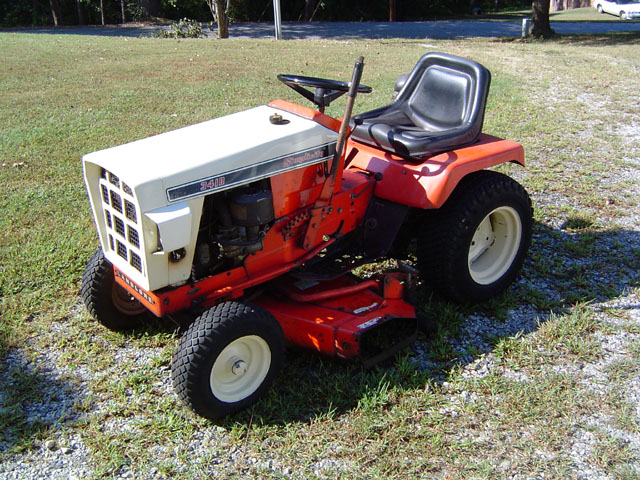
This may sound like a lot, BUT this machine is HEAVY DUTY! We're talking a cast-iron Briggs & Stratton engine and a scaled-down farm tractor rear end. Peek under a "big box store" machine sometime. The rear end looks like a washing machine transmission. You'll probably fork over more than $1,500 to boot. The final verdict? I cut my mowing time in half with this brute, the infinitely adjustable speed of the hydrostatic transmission only adding to its flexability.
Summer Repairs (8/1/14)
The Situation:

Over the past several weeks my trusty 7016 has been having issues. On a level or downhill run with the mower engaged she runs just fine. Put a load on it like going uphill and she bogs and begins losing power. The exhaust note changes too, sounding somewhat hollow as the revs slowly fall off and the machine slows to a crawl. I cleaned the air filter, replaced the fuel filter and drained the gas tank, refilling it with ethanol free (as advertised) gas.
I still had the same problem. If fuel and air are present in sufficient quantities, that only leaves spark or simply put... ignition issues. Not long after acquiring this machine, the original magneto called it quits and I replaced it with an automotive style coil to feed the points and provide spark. The downside to this patch is accelerated points wear and pitting. On a points ignition car the voltage is 12 to start and lower to run the engine. My setup... 12 volts all the time.
As I was thinking along these lines, I decided to replace the spark plug and points. There are certain phrases that strike fear into the hearts of DIY gear heads everywhere. You amble up to the counter person, hand them the numbers off the side of the engine and order your parts. Then you hear it. "That part is no longer available." What? "AND AWAY WE GO!"
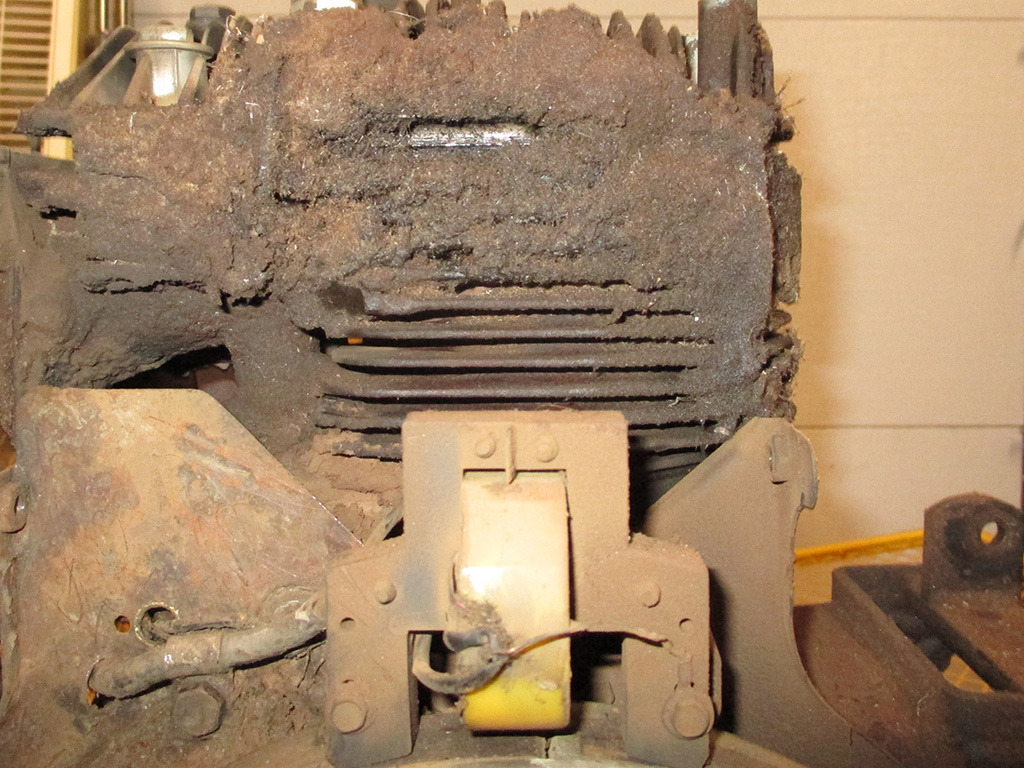
But first, I have to pull the engine and remove the shroud to get to the magneto. This is how the tractor came to have an automotive coil in the first place, it was cheap and easy. I pulled the fan screen, fan and shroud and found massive amounts of gunk everywhere.
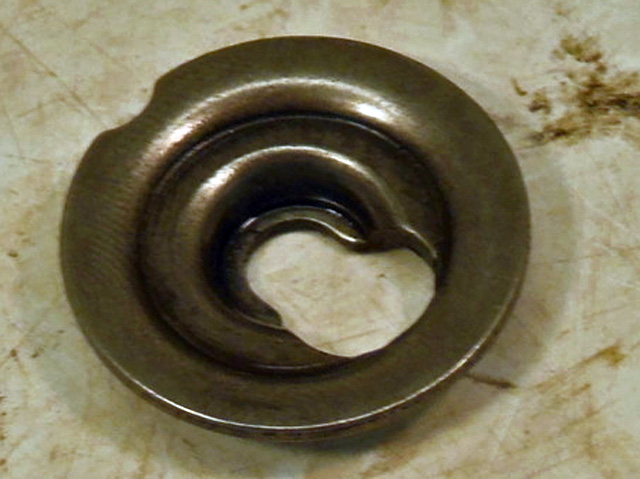
When I saw the oil/grass/dirt mixture on the fan screen I was suspicious that I would find something like this. Not only was the inside of the shroud coated with this sticky goo, but the fins were packed full of the stuff. A skinny regular screwdriver and several cans of beer later, I had removed the lion's share of the stuff and tossed it in the trash can. It was obvious at this point that a major teardown was in order so I could douse the thing in GUNK engine cleaner and hose the whole mess down out in the yard. Oh... remember the magneto? It's sitting bottom center, with the windings encased in a yellow cover.
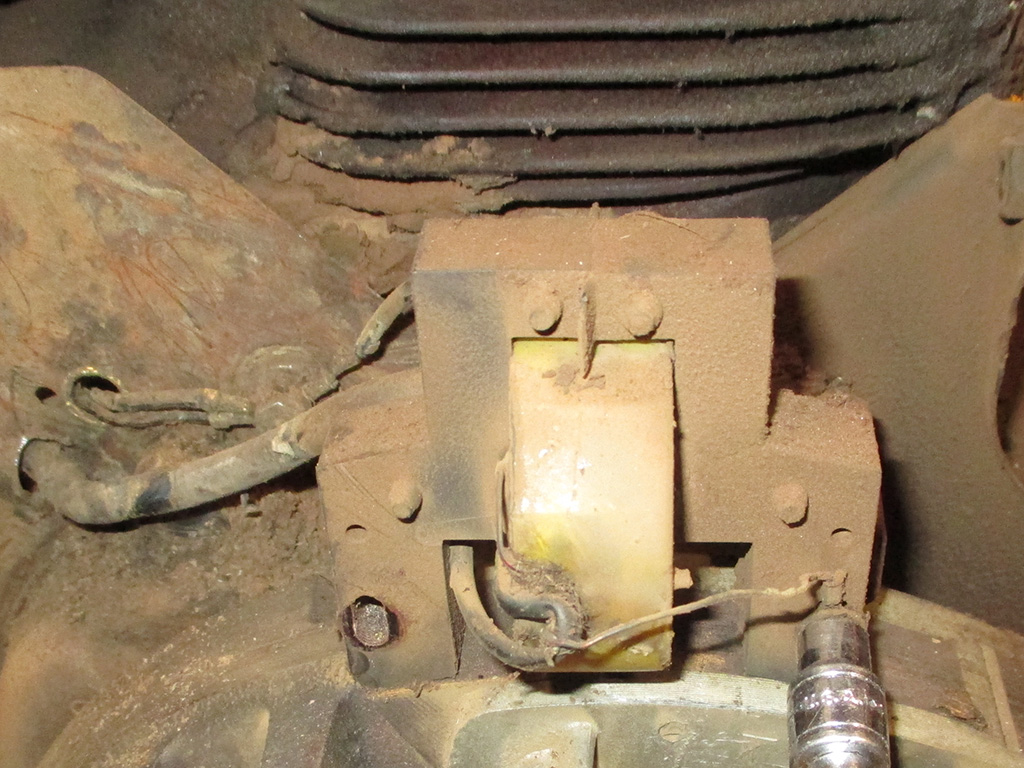
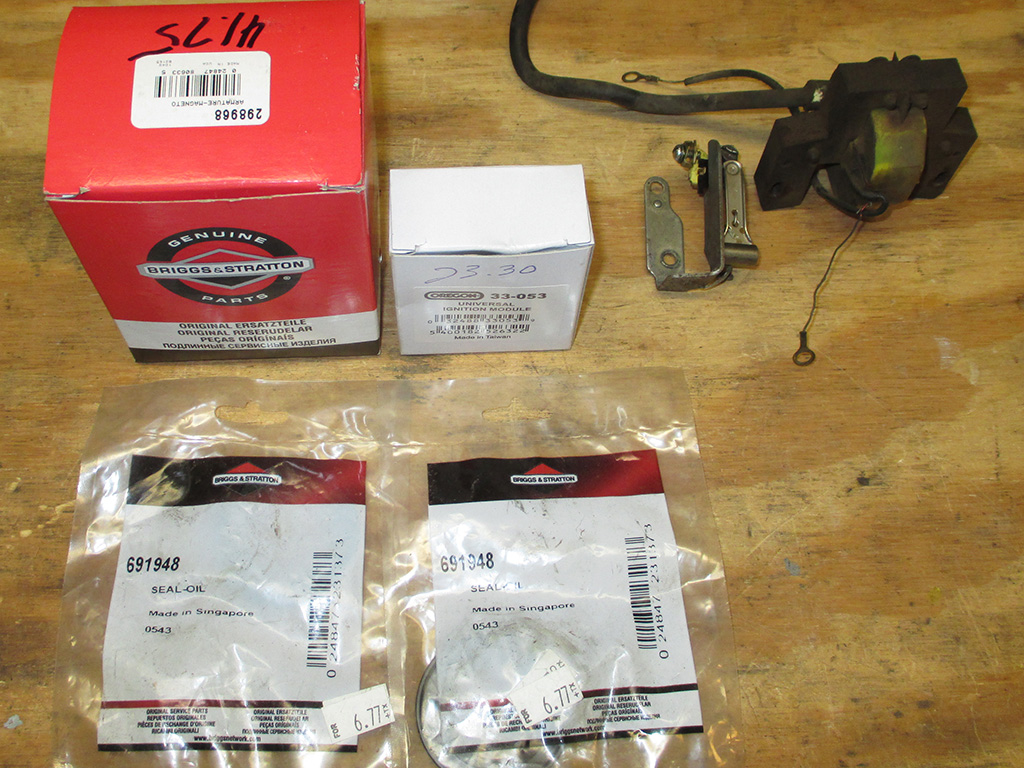
After evaluating all that needed to be done to the engine, it was time to get down to business. This was a handy reference shot for me, since I bought my parts on a Saturday morning and didn't get going on this until late Saturday afternoon. Errands really eat up time like there's no tomorrow. As I was working on the magneto, it occurred to me that the source of the gunk (or the glue that held it together) was an oil leak from a bad oil seal. The bad part? In order to replace the oil seal, I have to pull the flywheel off the engine and there's no telling how long it's been on there. So in addition to a new magneto I bought two oil seals, one for each end of the crankshaft.
I removed the locking plate and the flywheel nut, then pulled out my harmonic balancer puller (purchased many moons ago, useful for many purposes) and spritzed the crankshaft end with PB Blaster to help things along. You tighten the center bolt (I found a handy way to wedge the flywheel) and then give it a whack with a hammer. This particular job required several repetitions of this before it popped free. This tractor sat out in the weather for some time before I rescued it, so I was fighting more corrosion then I had working on my other machines. In the end though I was successful and finally gained access to the bad oil seal.

I inherited this small tack removal tool (I think it was in one of the cars I bought) which turned out to be perfect for working the old oils seal out of the engine cover. Once I got the seal out, I could feel what was wrong, the rubber that's supposed to ride on the crankshaft was hard, cracked and brittle. So, even though it was quite a task to get at the darned thing, it will be replaced and keep this problem from happening again at least for a little while.
Parts for fractional horsepower engines have always been expensive and this trip to the small engine shop was no different. But first, allow me to set the scene. You pull into an unmarked concrete lot that (judging from the state of disrepair), looks like it was poured around 1960. You also have to be careful not to trip over the remnants of the gas pump island that juts out of the center of the lot.
The building is low and white, its original use lost in the mists of time. Step through the door and you're instantly transported back in time. This is a world where the term "politically correct" has not even been dreamt of. You cross the threshold, instantly enveloped by a thick fog of cigarette smoke as ancient fluorescent fixtures buzz and fliker above. The bare chipboard counter is littered with battered ashtrays, starters and other assorted parts along with scribbled on bits of paper. Hours of operation are at the owner's discretion. You have to hustle, since they open at 8am and close at noon on Saturday. If it's hunting season... forget it. They're simply closed.
What you need always seems to be in stock, although it may have been purchased decades before. Credit cards are not accepted. Period. Cash is preferred but if you really must, they will take a check, provided you have several pieces of ID. For a grand total of 80 bucks I ended up with a USA made coil, A Taiwanese ignition module (ignition points were "no longer available") and two Singaporean oil seals. Christ!

I cleaned off the area around the seal, shined up the crank with some 800 wet/dry sandpaper and used a block of wood to tap the new seal into position. I didn't have a socket or section of pipe large enough so I used this method instead. Works just fine as long as you move around and around and don't try to tap one side in all at once, that only makes the whole thing pop out and you have to start over. The bracket to the left was my home brewed coil bracket and will be removed shortly.
I wanted to replace the seals first, since I would soon be hosing down the whole engine with GUNK and water and really didn't want water getting inside the motor. I even put some duck tape over the exposed ends of the crank to keep the water off. Turned out not to be worth the effort, I wiped the crank ends down with some WD-40 afterwards to hopefully ward off any flash rust after the big hose down.

I removed the plastic liner from my garden cart, loaded up the engine and soaked everything in GUNK engine degreaser. I even sprayed the inside of the shroud, the shroud backing plate and the backside of the flywheel itself. Then I used a small wire brush to make sure everything was scrubbed clean. A half-hour later, the fun part... blasting the whole shooting match with a sharp stream of water from the hose. By this time the rain had stopped and the sun actually came out to help dry things off. Amazing!
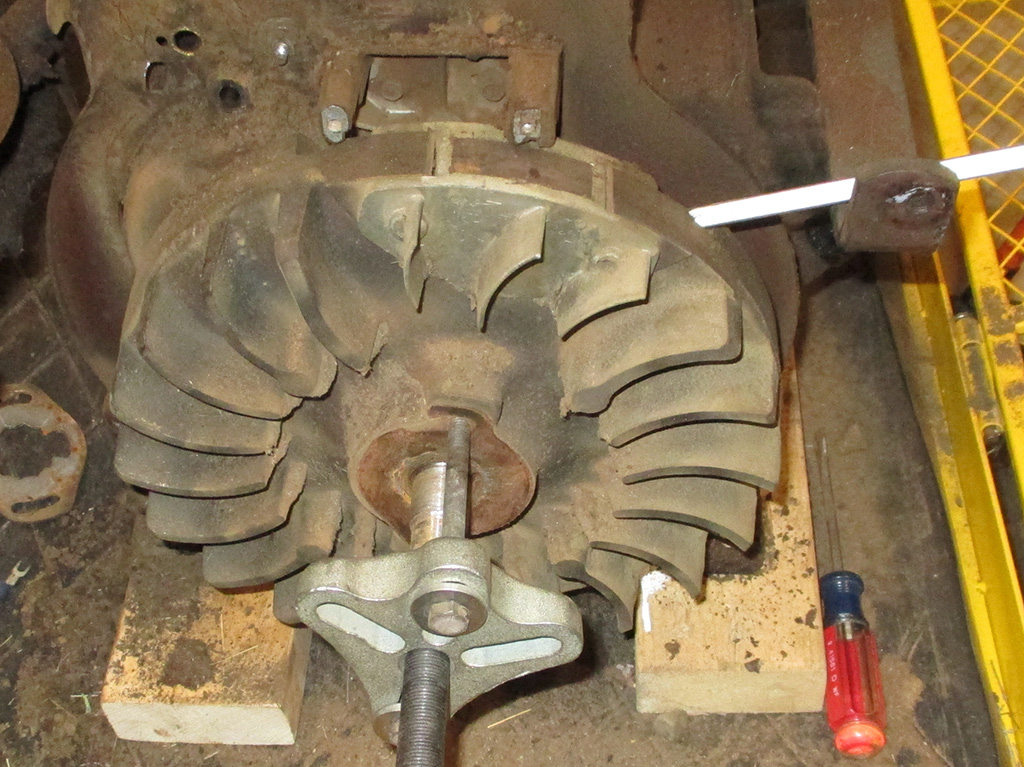
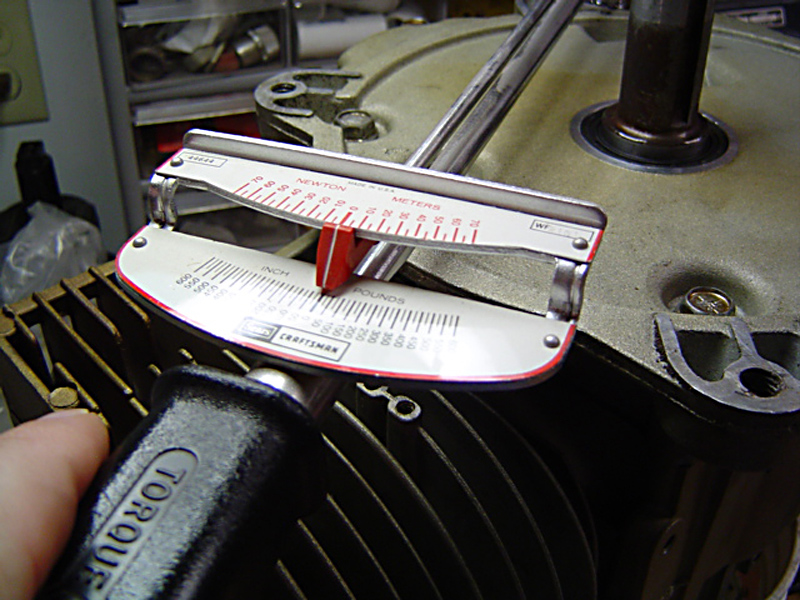
This picture represents my first rather futile attempt to re-torque the flywheel nut. The problem was, I had no concept of how much force I would need to exert on this to achieve the necessary torque reading. This meant I had to get creative. To that end, I drilled 3 holes in my workbench, bolted the engine to it and THEN was able to apply enough force to make the torque wrench CLICK. You don't realize how much force you must apply to get the 441 ft. pounds spelled out in the manual.
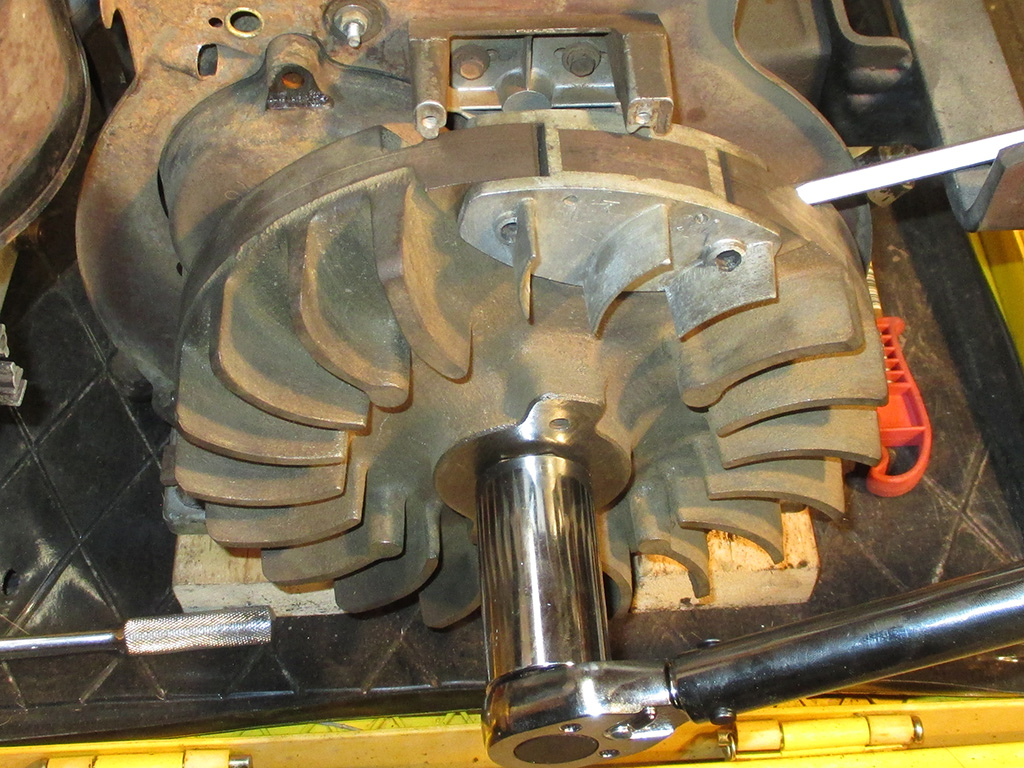
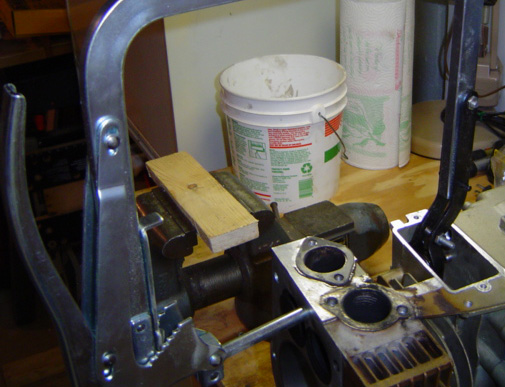
Below left, a shot of the front of the engine as it will sit in the chassis, looking suspiciously clean. Once I start cutting grass again, this won't last long. The last time I used the tractor to cut grass and parked it in the shed, it looked kind of fuzzy because of all the chaff and dust in the air sticks real good to a dirty engine. At least I won't get all oily and greasy hefting this bad boy back into place.
FRONT VIEW

REAR VIEW
Above right shot shows the fan side of the engine (including the fiberglass disc used to connect the driveshaft), normally hidden by the other components of the tractor. I actually just shot the screen with copious amounts of Formula 409 and scrubbed it with a nylon brush and it came out pretty good considering what I started with. The thing probably hasn't been this clean in a good many years. When I got this machine, the bevel gear box was shot, so I replaced it and just started running the tractor. I never looked any deeper than the repairs necessary to get it operational.
Remember when I said the points were "no longer available?" This little gizmo is what's supposed to replace the points! The points were always a pain in the ass on these machines, especially when retrofitted with an automotive coil like I did. Can't complain though, been running it that way for about 10 years give or take.
Now I have two unknowns. A. Did I get it wired in right even though I followed the simplistic diagram they give you with the module. B. Will it hold up under the severe duty the rest of the machine is exposed to in daily use? I won't find anything out for sure until I get this thing back together again this coming weekend. I hear it's supposed to rain all weekend... just for giggles.
Epilogue: Following some helpful tips on a "tractor pulling" website, I soon had the wiring sorted. For several weeks, the tractor ran great... the best it had ever run as a matter of fact. Unfortunately, just as I was re-gaining my confidence in this machine the tractor died. I used the starter (by cranking the tractor while in gear) to pull it into my garden shed, where it sits to this day. Summer is no time to delve into whatever was wrong. I fetched my Dad's old John Deere home, gave it a tune-up, sharpened the blades, added fresh gas and BAM! Back in business!
Friday Fiasco (6/5/10)
If you're wondering where project blue thunder has been lately (not to mention all my other projects) well, once again a home/yard project threw me a curve. My plan had been to spend a rousing day (finally a free Saturday!) of frame preparation and painting. This time (in what I hoped would be a dazzling display of my time management skills) my master plan hinged upon getting a jump on my chores by cutting the lawn on Friday, thus freeing up Saturday. Brilliant! Like several of my neighbors, I hopped on my tractor and rolled out of the shed. Unlike them, I rolled 20 feet and the front left tire rolled off the rim. "PERFECT!"
I had noticed both front tires were looking a little soft and was going to drive over to my shop to check both. The darned tractor had other ideas. First, you need to understand that the summer weather patterns in SC leave you a small window of time between when the morning dew evaporates, and the afternoon thunderstorms roll in.
This problem effectively blew my plans right out of the water. First I tied a rope around the middle of the tire, knotting it around a small screwdriver with which to tighten the rope. This helps seat the bead back against the rim for re-inflation. Unfortunately the air leaked out as fast as I could pump it in. This meant I needed a tube, necessitating a trip to the local hardware store. "AND AWAY WE GO!"
Of course, all of this was predicated upon me getting the wheel off the front axle shaft in the first place. It took several pulls before the outer bearing popped off, indicating the axle shaft had some corrosion issues. If you've ever installed a tube into a tubeless tire (don't laugh, it's a permanent leak-fixer) you know what a task it is, particularly trying to hold the rim while you pry on the tire with whatever ridiculously large screwdrivers you happen to have on hand.
My Method:

My solution was to root through my vast collection of junk valuable spare parts, to see what I could create. Amazingly enough, I found this 12 inch long bolt whose original purpose is best left to the imagination. For me, it made the perfect temporary mount for my wheel.
The cans of brake cleaner in this shot are what I typically use to clean parts, particularly internal parts that are not painted. I usually buy the store brand (or whatever's cheapest) so these must've been on sale when purchased.
This stuff really blasts the dirt and leaves no residue behind when you're finished. I usually pick up a few cans each time I stop by the local AutoZone. You really go through it fast on a project like this though.
Here's a couple of shots to show just how I mounted the rim securely to pry the tire up off the rim. The job was a real pain in the rear end, so there are no pictures of the actual process. I'm sure they exist somewhere on the web if you're as much of a glutton for punishment as I seem to be.

TOP VIEW

BOTTOM VIEW
The above-left shot shows the assortment of washers I found as well as an appropriate nut. Above-right: "mole cam" shot of the underneath side of the rim. This Rube Goldberg setup worked so well I threw the bolt-washers-nut assembly into my drawer of pullers for future use.
Axle & Bearings:

The owner's manual for the tractor is quite clear about cleaning and repacking the front wheel bearings every so many hundreds of hours. However, the job is dirty (not providing anywhere near the level of satisfaction one gets from admiring their freshly mowed lawn) and most of us typically follow these instructions religiously let it slide.
Since the grease came off the bearing faces in a semi-solid black ring I figured it was high time. Besides, I had to dress up the axle with some emory cloth anyway so the bearing could fit properly on the axle. By this time it was pouring down rain, so I resigned myself to take my time and do the job properly. I coated the axle with grease to prevent further corrosion.

I made two discoveries while immersed in this task. The good news was that (amazingly enough) despite any previous owner neglect the bearing races were in remarkably good shape. The second more troubling discovery was that the bearings were stamped "Made in Japan"
I know for a fact that the OEM brand was Timken, so this thing had obviously been taken apart at some point in its sordid past. No surprise there, but...
Since I was already behind the 8-ball time wise, I cleaned the bearings, inspected them and (finding nothing wrong with them) decided to clean and repack them as they were.

Sigh! You know, it's times like these when I wonder just how many Americans are out of work (not to mention homeless) due to this damnable outsourcing. My mind sure takes strange trips at times, particularly doing a mindless activity like blasting roller bearings clean.
My process was to clean each bearing then let it sit out in the sun to dry thoroughly. When I was finished, each bearing spun smoothly with no apparent grit or wobble present, so I bit my tongue and decided to re-use them. This saved me running to the parts place which is only open until 12 noon on Saturdays. When they eventually need replacing, then I'll make sure the bearings are stamped made in USA.
I lost some time Saturday morning running over to Harbor Freight for a bearing packer. If you've ever re-packed bearings by hand, you know how messy and time-consuming a job it can be. This thing rocks! Makes me wish I'd bought one of these gizmos years ago.

READY FOR GREASE

GREASED!
The above-left shot shows the bearing on the base. Above-right: the bearing packer cover, including the freshly packed bearing. Three pumps and presto, you're ready for re-assembly. Amazing! So, Friday was a wash and Saturday was spent mowing the lawn. If things keep up like this, I'll never get my Monte finished. Sheesh!
January 2007 - Murray Rebuild...
So, how is it that a perfectly sane (other than being a tractor nut), mechanically savvy person embarks on the completely loony odyssey of rebuilding the engine for a supposedly "disposable" Murray lawn tractor? Good question, glad you asked. You see, my father-in-law has this nice little Simplicity 727 with a dozer blade (and chains) that he brought down from New Jersey. If I do him this little favor, the cute little 727 (which runs just great mind you), can be all mine. Okay, I'll do it. Actually, typing that out took longer than the actual thought process!
Here we have (as close as I can tell) a late '80's vintage Murray Lawn Tractor. What's the difference between a "Garden Tractor" & "Lawn Tractor"? Pretty simple actually. A garden tractor runs (or has the ability to run) "ground engaging" equipment such as tillers snowblowers sickle bar cutters etc. A lawn tractor runs... a mower deck (okay you can pull a garden cart too) and that's about it. A larger version of a riding mower if you really want to get technical about it
Another tip off. Garden tractors typically come equipped (or did back in the day) with a horizontal shaft engine. Lawn tractors come with a vertical shaft engine for a direct connection to the mower deck, its only powered attachment. The good news was this one was equipped with a Briggs & Stratton engine. The bad news was it had an all-aluminum engine... yes, even the block and cylinder walls are aluminum.
This series of engines was known to fail primarily due to this poor design. The problem can be corrected though. If you have some basic mechanical ability and want to learn how, the job isn't that difficult. It's also the cheapest way to go... in this economy, who doesn't love that?
Rebuilding the engine of this Murray might be a good little overview for anyone out there with similar desires, who is determined to save a machine they love. Along the way, I encountered quite a few little bumps in the road that I thought I would make good reading over a cup of coffee. Hopefully you will be entertained and maybe even pick up a tip or two along the way. You'll save some dough in the bargain if you follow my example too. Replacement small engines are readily available... if you have deep enough pockets that is!
My father-in-law casually mentioned that the engine had overheated and had started knocking, so I had a pretty good idea what I was in for. I was further informed that he'd taken it to the local mower shop where they'd replaced the head gasket. I didn't think to ask how much he got soaked for this "repair" but having already volunteered my talents for this project, there was no turning back.
Damn the torpedoes full steam ahead. For those of you who may idly wonder just what happens when you overheat a small engine of the all aluminum variety... you end up with this. Scratch one Briggs and Stratton 12-HP vertical shaft engine.
Here, you can see the heavy gouge in cylinder wall from the piston rings. By the way, just how does replacing a head gasket fix an engine knock anyway? So.. uh, you sure you want to do this Dad? Of course, what a dumb question. Once it was decided that the engine would be a good candidate for a re-bore and the insertion of a cast iron sleeve, the project could commence.
Whenever tackling a project of this magnitude, organization is the key to a successful rebuild. Here you can see the engine completely dismantled and sitting on my workbench. This part was actually kind of fun... like when I was a kid taking apart a busted watch my Dad gave me to play with.
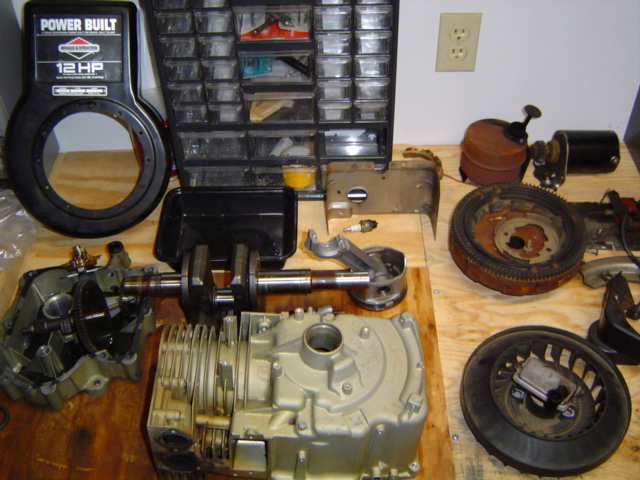
DISASSEMBLED

PARTS PILE
The above-left shot has the block, crank, flywheel and head removed and ready for refurbishment. Above-right, the few things my digital camera couldn't capture without a fancy wide-angle lens or something.
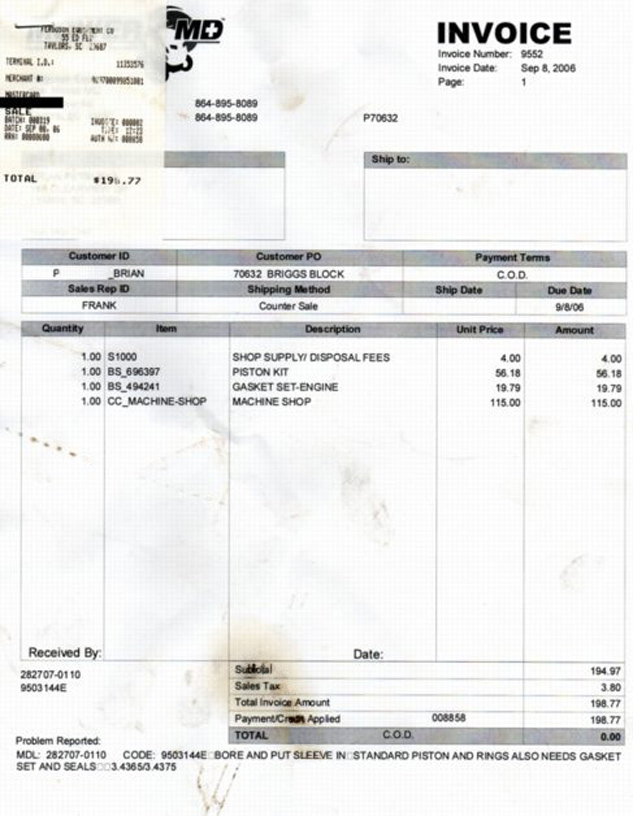
The hardest part of this whole operation wasn't finding someone willing to do the work, that turned out to be duck soup. After several shops desperately tried to sell me a whole new engine, (nope, father-in-law wasn't interested), I selected an independent shop not far from where I work in Greer SC. I figured I could drop it off after work one day and when it was finished, pick it up the same way. At least that was the plan going in. Nope, the hardest part was trying to get my block BACK after two months of it being at the machine shop!
The guy who ran the shop was pleasant and told me that yes, they do machine work but that it might take a couple of weeks since this was summertime, their peak season. Okay, no problem I dropped off my block and went on my way. My own job kept me hopping so when I stopped in four weeks later, I was hoping I might have gotten lucky and they'd have finished my engine.
The owner wasn't in, so his wife said she would have him call me. You guessed it, no phone call was forthcoming. Two weeks later, I stopped in again and spoke with one of the shop guys who tried to call the machine shop but got no answer. I gave them my home phone and work phone (again) and left the shop again with the promise of a phone call to update me. I knew their phone worked, I called them several times in the interim.
One week later, I stopped by to once again inquire of my engine. By now I should've had my own coffee mug sitting in their break room. This time I actually got to speak with the owner! I was amazed! He looked up my information on his computer terminal and discovered that the reason the machine shop hadn't finished the job, was (drum roll please), because they didn't have the model and serial numbers to tell them the specs of the proper bore piston and rings to use!
REALLY ??? I clearly remembered having given those the day I dropped off the block. Evidently my serial number had not been entered into the proper field on their work order. Thankfully I still had the info on a scrap of paper in my wallet. He apologized and I said that's okay, these things happen and I left, shaking my head.
Time marched on and week eight eventually rolled around. This time I walked into his shop with a full head of steam. Either I was getting my engine, he was telling me where his machine shop was and I'd go there and get my engine, or I'd call the local police and press charges for fraud, bunko and anything else I could think of. Now I'm as patient as the next guy, but now I was worked up into a fine lather.
Naturally, he smiled, reached behind the counter and produced my freshly bored and honed block, the gasket set I'd ordered and a new piston and ring set. Now I realized going in that they did not do rush jobs, but in 8 weeks I could have smelted my own aluminum ingots and cast a whole new engine for myself and been ahead of the game. I know, not really, but seriously... W.T.F.!!!
Where was I? So 2 months have gone by and finally reassembly is upon me. I know what I'm doing right . . . right? Issues with the shop owner aside, the machine shop at least appeared to know their stuff. The block looked factory fresh and I decided to document the process just in case any one else decides to tackle such a project. It is in fact really straight forward, my biggest hurdle was my rather fuzzy memory when it came to remembering just where exactly each part went in relationship to the others. Next time I'll document the disassembly process with photos too. Oh well, live and learn.
TOP VIEW
BOTTOM VIEW
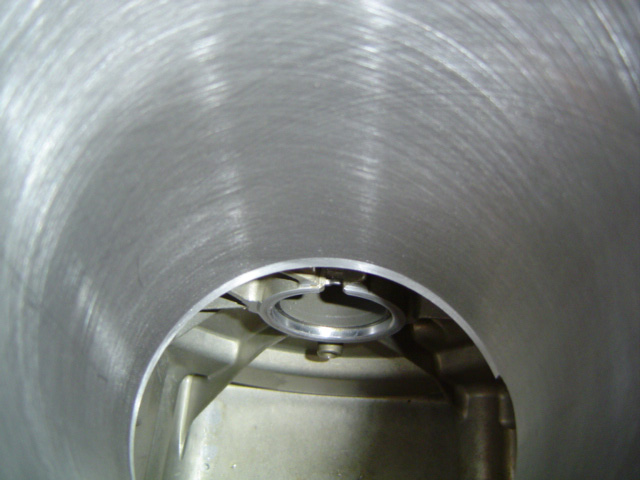
When you get your engine block back from the machine shop, this is exactly what you want to see. A nice crosshatch pattern which is necessary for the new rings to seat properly. This was an all-aluminum block which I had sleeved with cast iron (which Briggs & Stratton incorporated into their later designs), due to the excessive wear and premature failure of the all-aluminum block. You'd think they'd have learned their lesson from watching the auto manufacturers' trials and tribulations with aluminum blocks back in the day. I guess not.
Like most folks, if you've been at a given hobby any length of time, you'll inevitably acquire some specialty tools designed to make certain tasks easier. Case in point, my recent FleaBay acquisition... a very purposeful looking Piston Ring Expander. What exactly does a piston ring expander do? Uh... you're kidding right? For the uninitiated it's actually pretty simple. Instead of oh-so-carefully working the piston rings down over the piston from the top (the bottom ring having to be finessed over the two upper ring slots), you use this tool instead.
Makes the job at hand lots easier, speeding up the process. This assumes you have experience using said tool. Since I did not posess this experience, there was a lot of finagling to get the thing to work as designed. The good news was that I was not risking breakage of the rather fragile piston rings by manually fitting them over the piston with finger-power alone. The bad news was I fumbled around like an un-educated monkey who has been handed an intricate tool he's never used before.
Basically I had two things going for me. One, there were no witnesses to my uncharacteristic ineptitude. Two, I did manage to get the tool to work for the two lower rings. I cheated like crazy with the top ring, reverting back to pure finger-power for the win. Your mileage may vary, but there you have it... my little adventure with a new specialty tool.
At any rate, using both my new specialty tool and the old standard of carefully working the ring down over the top of the piston got me to this point. Brand new standard-bore pison and rings becoming acquainted with their new (hopefully permanent) home. This engine is now equivalent to the later IC line of engines produced by Briggs and Stratton with their integral cylinder liners.
Not seen in this shot is the piston ring compressor which is a sleeve of spring steel which you work down over the piston/rings assembly then tighten until the rings have been compressed into their respective slots in the piston. Then you oh-so-carefully tap the piston down (a wooden hammer handle works well for this), into the cylinder. Lubricating the piston/rings liberally with oil helps this process immensly. You simply hold the compressor tightly to the top of the bore and tap, tap, tap the piston down into its new home.
Thankfully, this step of the rebuild went smoothly. It's one of those little triumphs where you feel a great satisfaction at having read the procedure, then having executed it exactly as described in whatever book you're using to guide you through the experience.
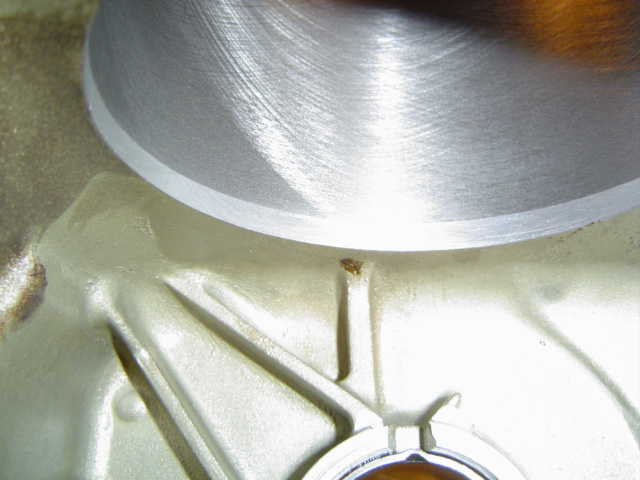
This was the newest Briggs & Stratton engine I have worked on. That being said, there were a couple of interesting developments I had not seen working on some of my older engines. One difference was the block being machined to provide clearance for the connecting rod bolt as seen here. I guess this was cheaper than re-casting a whole new block, but the logical side of my brain kept saying that there must've been a better solution than this.
Another key difference was the absence of locking tabs (a thin shim of steel plate beneath the head of each rod bold), that is typically bent up over one flat side of the hex head of a bolt. Presumably this is so the rod bolts do not work loose (I guess it must've happened at some point), and KA-BLOOEY! your engine goes up in smoke. So, I torqued the bolts to the recommended specs and moved forward with the rebuild.
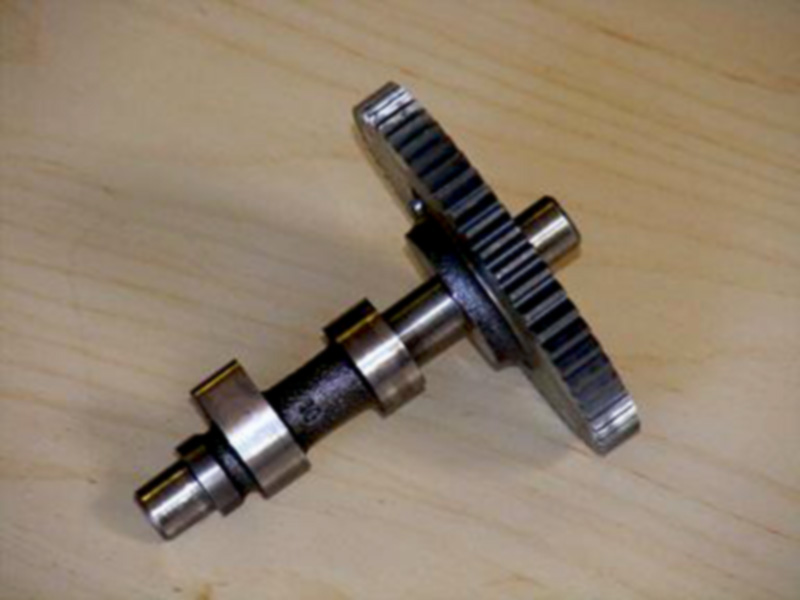
By the time I took this shot, I had already installed the crankshaft, synched up the timing gears and torqued the connecting rods to the proper specifications. One word of caution. I would whole heartedly suggest you purchase a shop manual for the model of engine you're working on prior to disassembly. There were times when I needed both hands free, so some important steps did not get photographed.
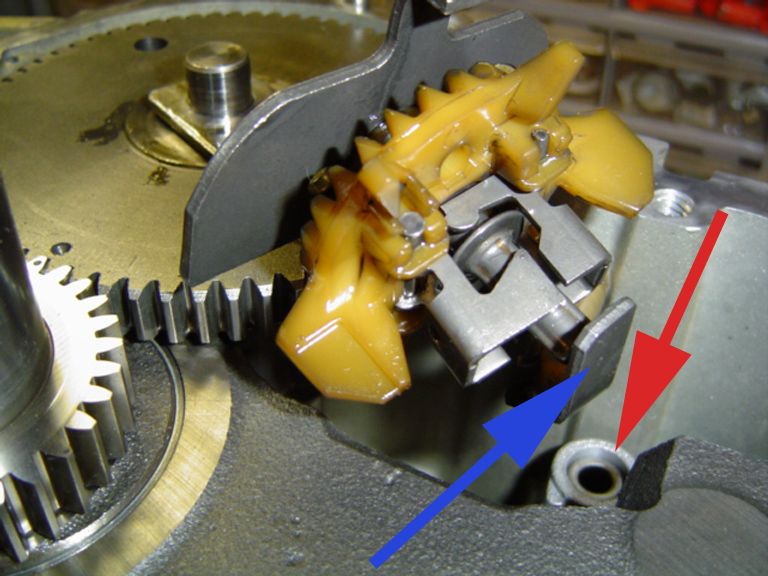
Below, I've reinstalled the crankshaft, timing gear assembly and governor assemblies. This seemed like the perfect opportunity to document what I'd just done, so I cleaned off my hands and grabbed the camera for a few shots. The red arrow shows the unique counter balance unit, the blue arrow the actuating lever for the governor. Man, the insides of this baby sure are clean aren't they? Cleanliness is next to godliness when you tackle a project like this, so I went to great lengths to insure that everything was as clean as possible prior to reassembly.
MARKS ALIGNED
GOVERNOR ASSEMBLY
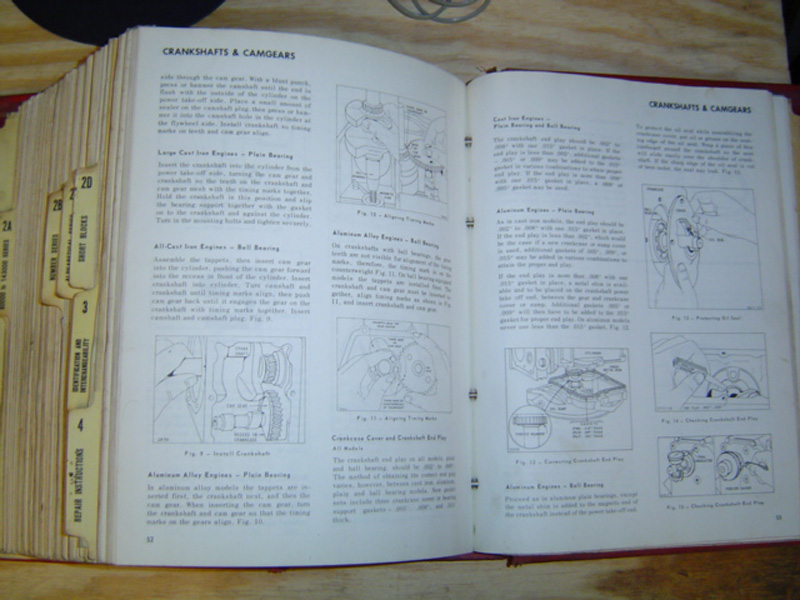
The best procedure is to reassemble everything as soon as possible, primarily so you don't forget just exactly how you took the darnded thing apart. Had I known going into this that the blasted machine shop was going to drag its heels the way it did, I would have documented the disassembly process thoroughly. For the most part the engine will only go together one way, but I did have to refer to my shop manuals several times. That's one reason why I have one cabinet dedicated to housing all of my printed information.

Here's what my humble little book cabinet looks like. Between the BFB (big freaking binder) for Simplicity products and the one for Briggs and Stratton, the first shelf is pretty stuffed. In fact, following this project I had to use a second shelf in this cabinet, pretty much filling it with printed material. But when you need a specific piece of information (like what the proper ring gap should be so you can file your brand new rings down to factory specs), these are just as valuable to me as the tools in my roll-away.
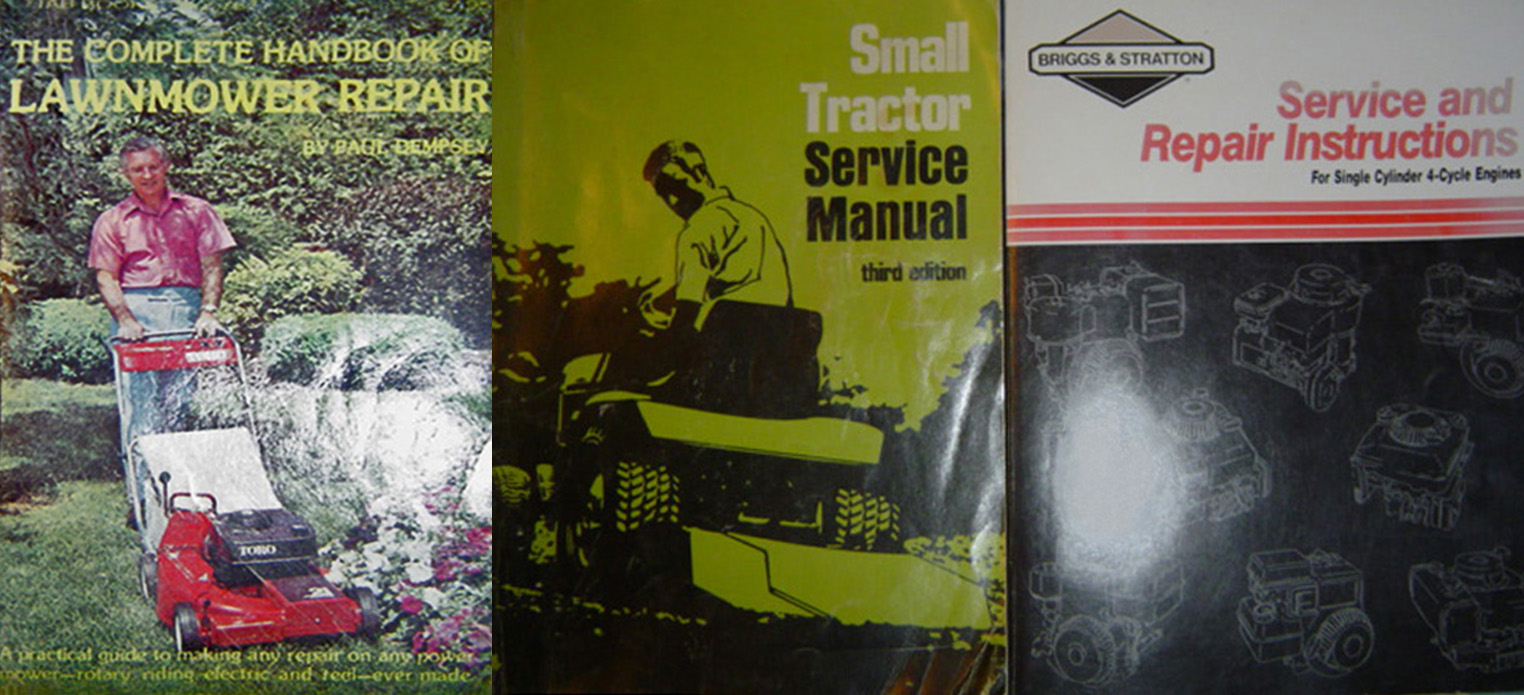
These three are my most-used (not to mention most dog-eared), books that I began accumulating back in the 1970's when I first started tinkering with small engines. The small tractor manual was one of the first I purchased when I was working on my Dad's little Allis Chalmers garden tractor. The lawn mower repair guide came from my lawnmower repair and go cart era. The Briggs manual I picked up at a flea market since it focused exclusively on the engines I was running accross most of the time.
This is my most recent acquisition, which I won on fleece bay. I purchased this because it covered the specific serial number range of the engies I'm currently working on. It wasn't very expensive (the seller had cleaned out an old mower repair shop), and these were the types of books the gristled old cigar-stub-chomping counter man would use to track down a replacement for whatever failed part you brought in to the shop. Today, everything's on computer servers, but being an the cusp of early onset curmudgeonry, I can relate better to printed material. You just can't beat one of these old professional repair manuals.

Turning back to the project at hand, here's another angle, showing the brass actuator for the governor in position. Also on prominent display is the counter balance rod (for lack of a better description), seen from a different perspective. I'm not quite sure how it works, but when this baby's running there sure is a lot of stuff spinning around in here.
Not only did I have to "thread the needle" with the crankshaft and timing gear, I also had this little aluminum counter balance rod flopping around, which I had to grab with my 3rd hand (top secret device, patent pending) to guide it onto its own special little shaft as well. And we shade-tree mechanics wonder why small engine repair shops charge so much for labor. Sheesh!
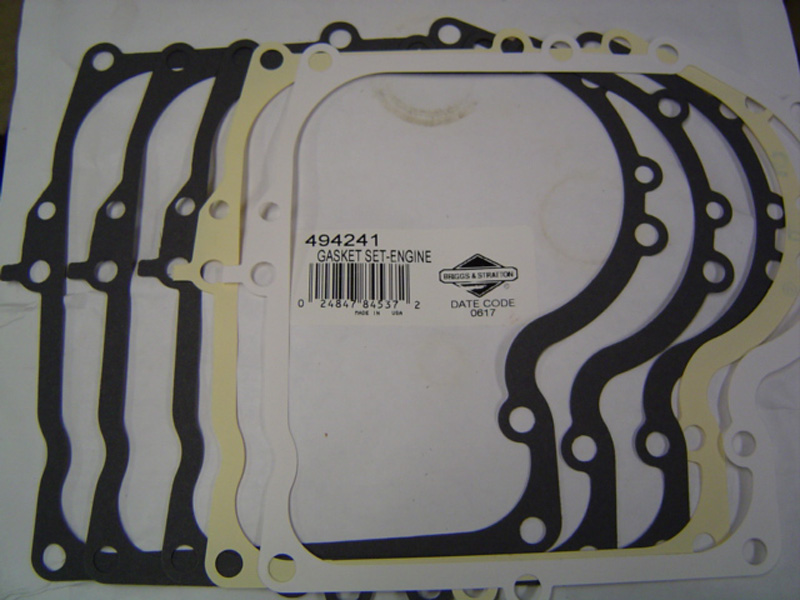
One thing I made sure to do when I first dropped this engine off at the machine shop was to order a complete set of gasket and seals. You're gonna need 'em anyway, so the smart move is to tell the counter person exactly what you're attempting to do. That way, even if you forget to order something as unexciting and mundane as a set of gaskets, a savvy counter person will bring up this subject. Gas prices aren't likely to go down, so save yourself a trip and order a set of these babies up front.
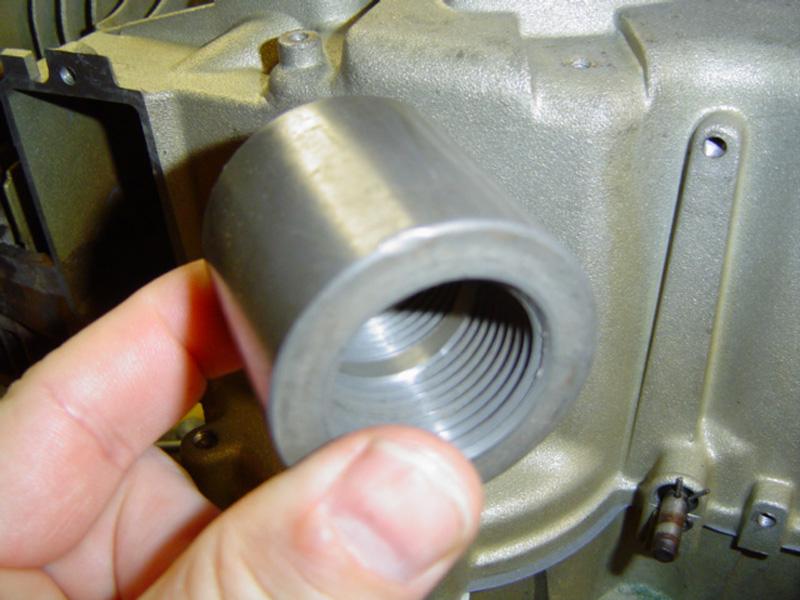
Over the years I've gotten used to installing seals with a socket that closely matches the diameter of the seal in question. This time, I found a plastic pipe fitting sitting in my plumbing parts drawer that proved to be the perfect diameter for the task at hand. You can either install the seals before mounting the cover (as I did with the bottom crank cover seal), or intall the seal on the engine (I had to use this method on the top seal, which is under the flywheel), if you hit a snag like I did.
So that's how I ended up using a plastic coupler whose inner diameter cleared the crank, while the inner diameter was a perfect match for the metal part of the seal I was installing. Sometimes you just have to stand back and look at a problem for a bit, before a solutioin will present itself.
So I was really humming along at this point, gasket and seals installed, engine kept right on going together... I was in the groove. Then it happened. The last bolt, as I worked my way around the cover suddenly got too easy to turn after it had been snugging up just like all the others. That meant only one thing. STRIPPED THREADS! And I'd been using a torque wrench... just because this is what can happen if you tighten up things "by feel."
Oh no! OH YES! Since I was dealing with steel bolts threading into an aluminum block, it didn't take a genius to figure out where the problem was. CRAP! Deep down inside, I knew there was only one thing to do. I had to take the whole cover off and repair the threads with a Helicoil. Thankfully, I keep some around for... for just such an emergency.
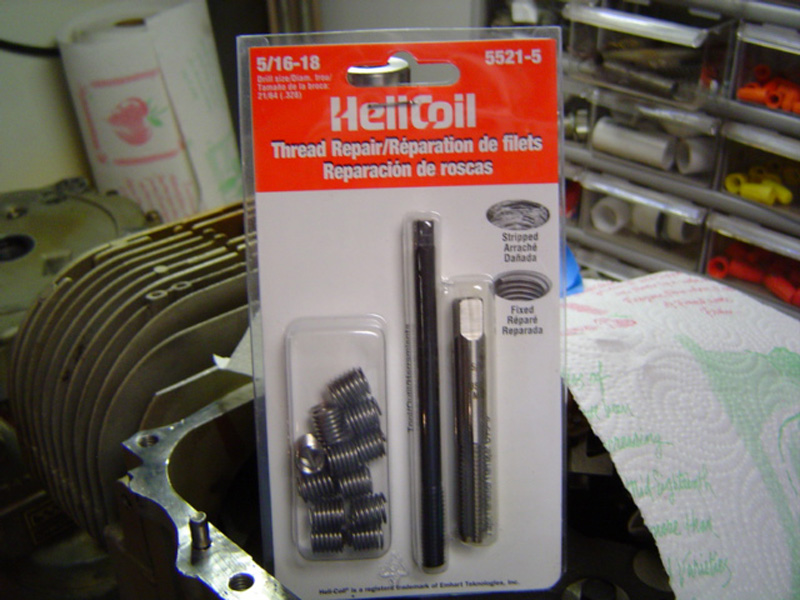
This is the Helicoil set that is the proper size for the project I'm working on. Remember when I said I keep some of these on hand for emergencies? Guess what? Naturally Murphy's Law kicked in and low & behold I DID NOT have the size that I would need to repair the threads. Fortunately, my luck wasn't all bad and I was able to make it to the hardware store (with 10 minutes to spare no less) before they closed for the weekend.
My more sharp eyed readers will note what comes with this set... and what does not come with it. On the back of each Helicoil repair kit is listed the drill bit size that is needed to use the kit. Said drill bit is most decidedly NOT INCLUDED in this set. Therefore one must purchase this additional item separately. In the U.S., the Helicoil set isn't cheap and good quality drill bits (the ones that will last beyond one use) aren't cheap either.
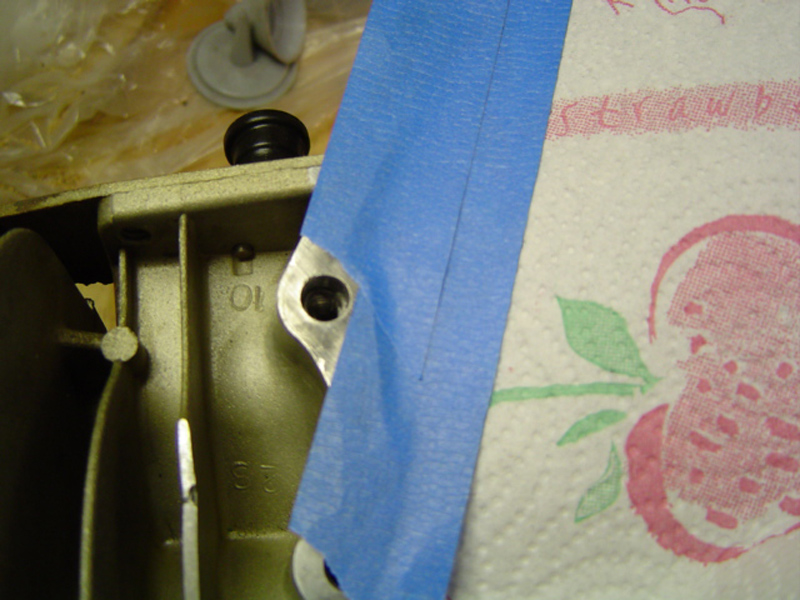
After removing the crankcase cover I took the necessary step of covering the crankcase before drilling out the stripped hole to the proper diameter for the helicoil. The last thing I needed (other than a stupid stripped out bolt hole that is), was to get metal shavings all down inside the crankcase. No need to get fancy, as you can see I used a paper towel and some masking tape and Presto, no shavings can get where I definately do not need them.
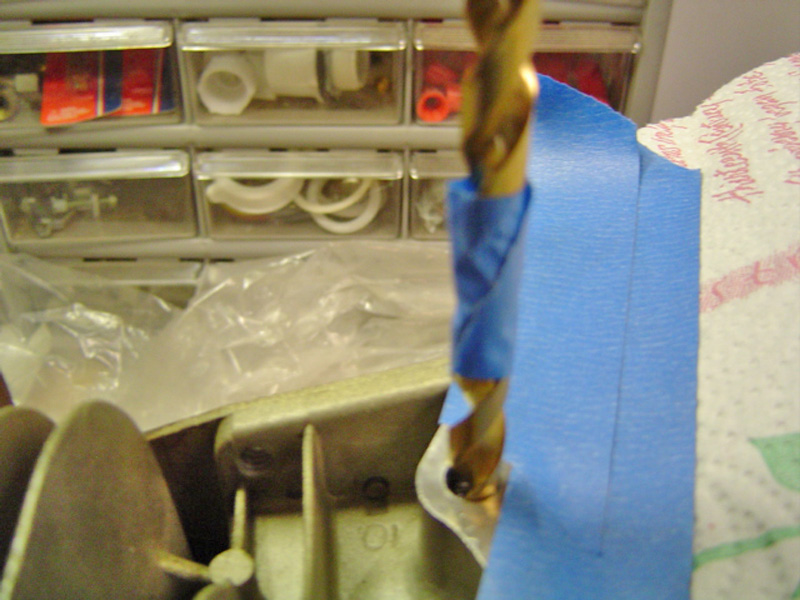
Like I said, this isn't my first rodeo, although I have some of the more popular sizes of Helicoils sitting in my toolbox, this particular size was not in my inventory. So much for pre-planning. This meant a major purchase (not to mention playing beat the clock to get to the hardware store before noon on a Saturday), since I usually buy a the right size drill bit for the job when I pick up the repair kit. Once purchased, I keep these dedicated bits in my Helicoil drawer, so I'm not tempted to use one of them on something ordinary. The sizes of the bits tend to be atypical too, yet one more reason why I keep them as Helicoil only bits.
In day-to-day use, I tend to be HELL on drill bits. To the extent that I have a Drill Doctor drill bit sharpening tool on one of my workbenches. Still more motivation keep my "special" drill bits separate from my "regular use" bits.
The blue tape wrapped around the drill bit is my homebrewed depth gauge. I simply insert a screwdriver, nail, pencil (anything handy that will fit into the hole) when it hits bottom I put my fingernail on the "measurement tool" and place it up against the drill bit. Wrap some tape around the bit and you'll never drill too deep into something again. This is particularly handy when dealing with wood, since you can easily drill through a piece you only wanted a certain depth in.
Below left, with the hole bored out to the proper diameter (and after threading it with the included tap), it's time to thread the helicoil onto the included tool and install it. You simply thread the helicoil into the prepared hole and using the tool, snap it off once the coil is a little below the surface as described in the instructions.

READY FOR INSTALL

REPAIR COMPLETE
Once you use one of these kits you'll want to take your hat off to the guy who invented this system. Before this, you had to bore out the hole for the next size larger bolt! That meant you'd have one oddball bolt in with all the other matching bolts. You might have to enlarge the bolt hole in the cover as well. This is a much better method of making repairs to stripped out bolt/screw holes.
So... after taking a rather lengthy detour through the land of stripped threads, it's time once again to install the crankcase cover and tighten up all the bolts... and hope nothing else breaks. Again I applied my trusty torquewrench, hoping whoever stripped out the one hole stopped there. Turns out he did and the rest of the cover installation went off without a hitch.
This is a valve spring compressor tool, actually designed for automotive use. They make one for small engines, which slips between the base of the spring and the top of the valve spring keeper. That particular tool works from within the valve spring case, which is working in tight quarters. I had this particular tool sitting in my trusty tool box, so I figured what the hell, let's give 'er a try.
Turns out this tool worked just fine as you can see here. Sure, I had to make a few adjustments to get this tool to work on a smaller engine, but the basic design of the tool lended itself quite well to this use.
Below left, the reason why I removed the valve springs from the engine. I needed to take the pressure off the camshaft (via the pushrods), in order to remove the camshaft and later the crankshaft. I could've mic'd the valves to see if they needed replacement, but one valve I purchased for another engine set me back $38 bucks, so I focused on getting the moter back in service with the parts I had on my bench.

PUSHRODS RETRACTED
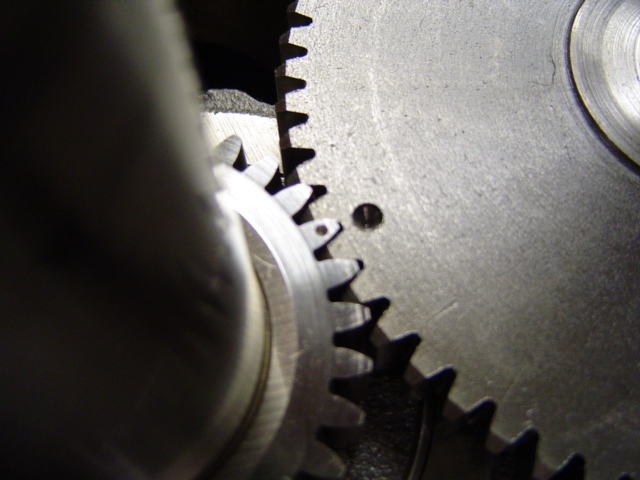
CAMSHAFT GEAR
Partially in view in the above left picture is the timing gear on the crankshaft. These are the two gears that have to be assembled with both timing marks together in order for everything to function properly.

Below left, one of the worst things you'll tangle with if you follow in my footsteps. The only way I've found to install these little bastards is to put a dab of greese on a long screwdriver, then reach in and hopefully place it properly without dropping it. Hey... you even get the pleasure of this little task twice! Provided you don't have to chase after one in the bowels of the crankcase, or... you know what... you might even have the pleasure of accidently disloging the first half with the second half! Now that is some under-valued fun brother.
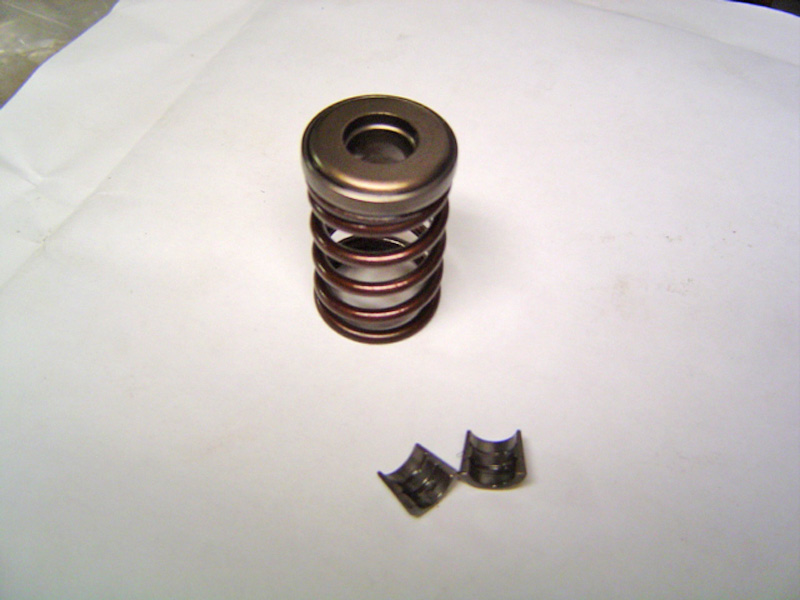
PIA DESIGN
BETTER DESIGN
The keeper on the right, well friends... it slips right into place first time, every time. I gotta say I just love this design, for it's plain old simplicity and ease of use. Not being an engineer, I don't know exactly why there are two different designs, I just know which design will drive you up the wall in 2nd gear, and which one is more user-friendly. As always, your mileage may vary.
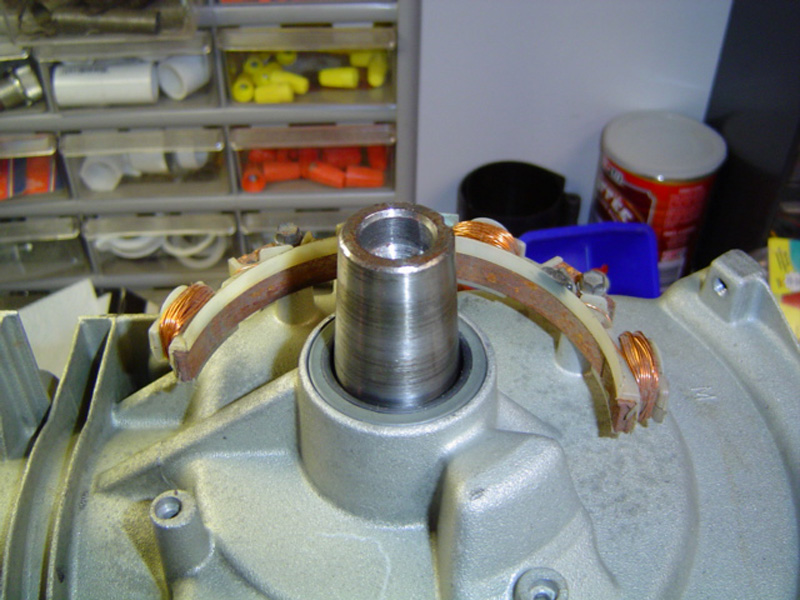
The little semi-circle of copper windings in this shot is the alternator which (theoretically at least), keeps the battery charged. A very simple assembly to both remove and install with a simple plug that mates up with the wiring out on the tractor itself. The plug (not seen in this shot), will only connect one way, so it's pretty goof-proof. A much more compact arrangement than the starter/generator on my older Simplicity machines, I must say.
Once you're in the groove and assembly is flying along at a good pace, it's difficult to clean your hands, grab the camera and fire off a few shot for each part getting installed. So, here's a shot of the next three pieces to become reacquainted with the engine and the order in which they are to be installed. Yeah, it's kind of a cheat, but it's the only way to illustrate the next few steps with the photos already on my hard drive. Sometimes ya just gotta make do.
So what we've got here is flywheel first, blower/fan second and the crown jewel... the chaff screen. Again this is the easy part compared to all the other stuff I've done to this little engine. All that remains now is to add the carb, some other sundries and the shroud and that's it baby!

Well, it's been quite awhile, but here she is all bolted back down into her chassis once again. Looks exactly the same as it did before I tore it apart. Except perhaps that the whole thing is rather suspiciously clean by comparison. Granted she's a little dusty in this shot (I had to give 'er a test drive after all), but the lack of oil leaks is the biggest change you can see from the outside. Inside of course, the engine has been thoroughly refreshed, ready to give more years of dependable service.
FINISHED! As stated previously I left out a lot of the little things that go really quickly. Instaling the shroud, breather assembly (which covers the valve spring box), and littls stuff like the carb, governor linkages, air cleaner and assorted baffles were not photographed. I just don't want my readers to think this is a step-by-step instructions list. Instead it was intended to be an overview of the process showing how simple it can be to rebuild a small engine in a generic lawn tractor. All you need is mechanical ability, the right tools and a machine shop to perform the boring/honing/sleving operations that they are proficient with.
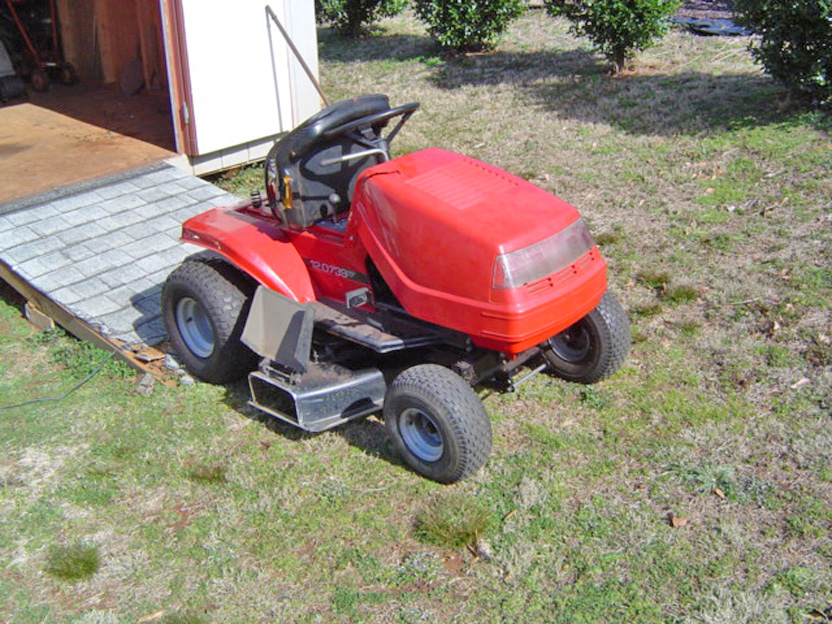
My latest acquisition was this little machine. It came to me via my inlaws in trade for rebuilding the engine on my father-in-law's little Murray riding mower. It may not be pretty at the moment, but I plan on restoring it to be a back-up mowing machine in case my primary 3410 machine is down for service.
I did find a mower deck on eBay, but this time I got hosed. I should've known I was in trouble when I had to file an "item not received" dispute after 3 weeks time. It finally arrived and the seller sent me a terse email to end my dispute. Which I did... 2 days later. When I went to leave him feedback eBay had terminated his account. The mower deck had been rusted and welded so many times it's not even remotely amusing. Oh well, you're bound to run into a bad egg if you eBay long enough I suppose. I'll turn to a club member next time.
Craftsman GT-18 (6/1/12)
I scored this monster off Craig's list. It cost me the vast sum of $125. In retrospect, I'm not sure why exactly. I probably need professional help at this point. I think I had it in the back of my mind to keep this at my folks place and buy/swap their little John Deere for my much smaller yard. But once again while my ambition knows no bounds, the amount of spare time I actually have has strict limitations. Here we can see one front wheel is cocked at an odd angle, probably have to heat it with a torch to straighten it back out, and that's just for starters.
This is my biggest machine yet, with a twin-cylinder engine and 52" deck! I've seen pictures of these with a front-end loader attachment (and rear wheel weights), but doubt I'll invest in one for my use. Most of what I use these garden tractors for is lawn mowing duties. Living in the South, there's no snow to plow, the one garden I planted was a joke, so for me grass cutting is numero uno.

I grabbed a new muffler off flea-bay for 20 bucks. Then I read this little tidbit on the garden tractor talk website. "Just make sure the muffler remains intact. If it gets a hole in it, the valve seats will cool at a different rate & eventually loosen up. The repair is both temporary and a pain to do." Wait... intact? INTACT? Houston, I think we have a problem.

© Copyright 2009 Brian Petruska | Top | Upgrades | GM Performance Parts | HTML Now! | Apple | Comments |